cloudNet@ 팀의 가시다 님이 진행하는 테라폼 102 스터디 6주차 정리입니다.
인프라 규모가 커지고 관리 팀원이 늘어날 수록 코드 관리가 필요 → 서로 작성 코드 점검 및 협업 환경 구성
구성 요소 : 코드를 다수의 작업자가 유지 보수 할 수 있도록 돕는 VCS Version Control System + 테라폼 State를 중앙화하는 중앙 저장소
✅ 실습 1 . 테라폼 클라우드 ( Local )
- 구성 목적
- 관리 : 지속적인 State 백업을 위해서 local 이외의 저장소가 필요, 하지만 실제로 Terraform 동작은 로컬에서 하려 할때
- 공유 : 다수의 작업자가 동일한 State로 접근해 프로비저닝하기 위한 공유 스토리지 필요
- 격리 : 민감한 데이터가 State 파일에 저장될 가능성을 고려하여, 각각의 환경에 따라 접근 권한 제어 필요
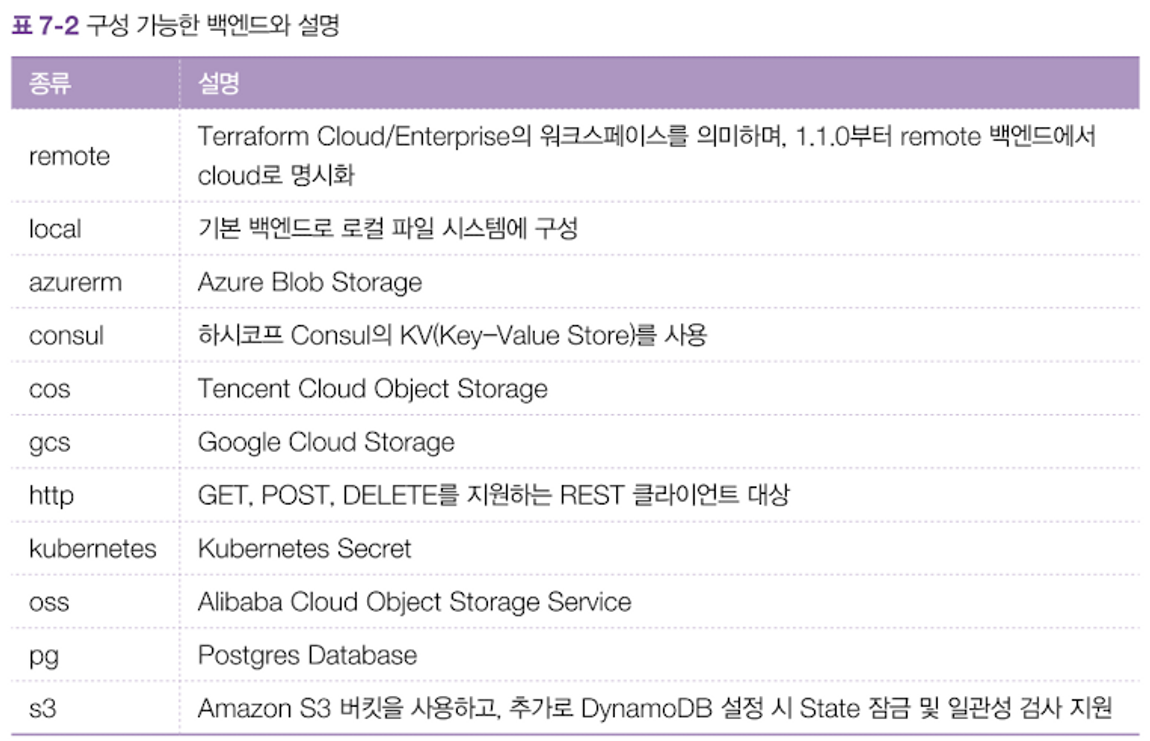
- 구성 가능한 백엔드와 설명
1. Terraform Cloud 사용해보기
- 접속방법
https://app.terraform.io/session
- 하시코프에서 프로비저닝 대상과 별개로 State를 관리할 수 있도록 SaaS 환경인 TFC를 제공하며 State 관리 기능은 무상을 제공
- 무료 계정 생성 ( Free Plan : 사용자 5명 , 리소스 500개 , 기본 기능 무료, State 히스토리 관리, State lock 기본 제공 )

- TFC를 통하여 작업 결과 공유 설정
- tom 루트 모듈의 main.tf 파일 수정
- TFC 계정을 만든 후 ORG 를 입력합니다.
terraform {
   cloud {
     organization = "themapisto-org"         # 생성한 ORG 이름 지정
     hostname     = "app.terraform.io"      # default

     workspaces {
       name = "terraform-aws-collaboration"  # 없으면 생성됨
     }
   }
  required_providers {
    aws = {
      source  = "hashicorp/aws"
      version = "~> 4.0"
    }
  }
}

provider "aws" {
  region = var.region
  default_tags {
    tags = {
      Project = "T101-Study-6week"
      Owner = "jerry & tom"
    }
  }
}

resource "aws_vpc" "hashicat" {
  cidr_block           = var.address_space
  enable_dns_hostnames = true

  tags = {
    name        = "${var.prefix}-vpc-${var.region}"
    environment = "Production"
  }
}

resource "aws_subnet" "hashicat" {
  vpc_id     = aws_vpc.hashicat.id
  cidr_block = var.subnet_prefix

  tags = {
    name = "${var.prefix}-subnet"
  }
}

resource "aws_security_group" "hashicat" {
  name = "${var.prefix}-security-group"

  vpc_id = aws_vpc.hashicat.id

  ingress {
    from_port   = 22
    to_port     = 22
    protocol    = "tcp"
    cidr_blocks = ["0.0.0.0/0"]
  }

  ingress {
    from_port   = 80
    to_port     = 80
    protocol    = "tcp"
    cidr_blocks = ["0.0.0.0/0"]
  }

  ingress {
    from_port   = 443
    to_port     = 443
    protocol    = "tcp"
    cidr_blocks = ["0.0.0.0/0"]
  }

  egress {
    from_port       = 0
    to_port         = 0
    protocol        = "-1"
    cidr_blocks     = ["0.0.0.0/0"]
    prefix_list_ids = []
  }

  tags = {
    Name = "${var.prefix}-security-group"
  }
}

resource "aws_internet_gateway" "hashicat" {
  vpc_id = aws_vpc.hashicat.id

  tags = {
    Name = "${var.prefix}-internet-gateway"
  }
}

resource "aws_route_table" "hashicat" {
  vpc_id = aws_vpc.hashicat.id

  route {
    cidr_block = "0.0.0.0/0"
    gateway_id = aws_internet_gateway.hashicat.id
  }
}

resource "aws_route_table_association" "hashicat" {
  subnet_id      = aws_subnet.hashicat.id
  route_table_id = aws_route_table.hashicat.id
}

data "aws_ami" "ubuntu" {
  most_recent = true

  filter {
    name = "name"
    #values = ["ubuntu/images/hvm-ssd/ubuntu-disco-19.04-amd64-server-*"]
    values = ["ubuntu/images/hvm-ssd/ubuntu-bionic-18.04-amd64-server-*"]
  }

  filter {
    name   = "virtualization-type"
    values = ["hvm"]
  }

  owners = ["099720109477"] # Canonical
}

resource "aws_eip" "hashicat" {
  instance = aws_instance.hashicat.id
  vpc      = true
}

resource "aws_eip_association" "hashicat" {
  instance_id   = aws_instance.hashicat.id
  allocation_id = aws_eip.hashicat.id
}

resource "aws_instance" "hashicat" {
  ami                         = data.aws_ami.ubuntu.id
  instance_type               = var.instance_type
  key_name                    = aws_key_pair.hashicat.key_name
  associate_public_ip_address = true
  subnet_id                   = aws_subnet.hashicat.id
  vpc_security_group_ids      = [aws_security_group.hashicat.id]

  tags = {
    Name = "${var.prefix}-hashicat-instance"
  }
}

resource "null_resource" "configure-cat-app" {
  depends_on = [aws_eip_association.hashicat]

  // triggers = {
  //   build_number = timestamp()
  // }

  provisioner "file" {
    source      = "files/"
    destination = "/home/ubuntu/"

    connection {
      type        = "ssh"
      user        = "ubuntu"
      private_key = tls_private_key.hashicat.private_key_pem
      host        = aws_eip.hashicat.public_ip
    }
  }

  provisioner "remote-exec" {
    inline = [
      "sudo apt -y update",
      "sleep 15",
      "sudo apt -y update",
      "sudo apt -y install apache2",
      "sudo systemctl start apache2",
      "sudo chown -R ubuntu:ubuntu /var/www/html",
      "chmod +x *.sh",
      "PLACEHOLDER=${var.placeholder} WIDTH=${var.width} HEIGHT=${var.height} PREFIX=${var.prefix} ./deploy_app.sh",
      "sudo apt -y install cowsay",
      "cowsay Mooooooooooo!",
    ]

    connection {
      type        = "ssh"
      user        = "ubuntu"
      private_key = tls_private_key.hashicat.private_key_pem
      host        = aws_eip.hashicat.public_ip
    }
  }
}

resource "tls_private_key" "hashicat" {
  algorithm = "RSA"
}

locals {
  private_key_filename = "${var.prefix}-ssh-key.pem"
}

resource "aws_key_pair" "hashicat" {
  key_name   = local.private_key_filename
  public_key = tls_private_key.hashicat.public_key_openssh
}- TFC 전용 워크스페이스(State 백엔드 역할만 수행) 확인 → 선택 후 좌측에 Settings 클릭 → General의 실행모드 변경
- Remote : 테라폼 실행을 Terraform Cloud에서 수행
- Local: 테라폼 실행을 작업자 환경에서 하고 State만을 동기화
- Agent: 테라폼 실행을 사용자 지정 Agent가 설치된 환경에서 수행이와 같이 State를 추적할수 있음.
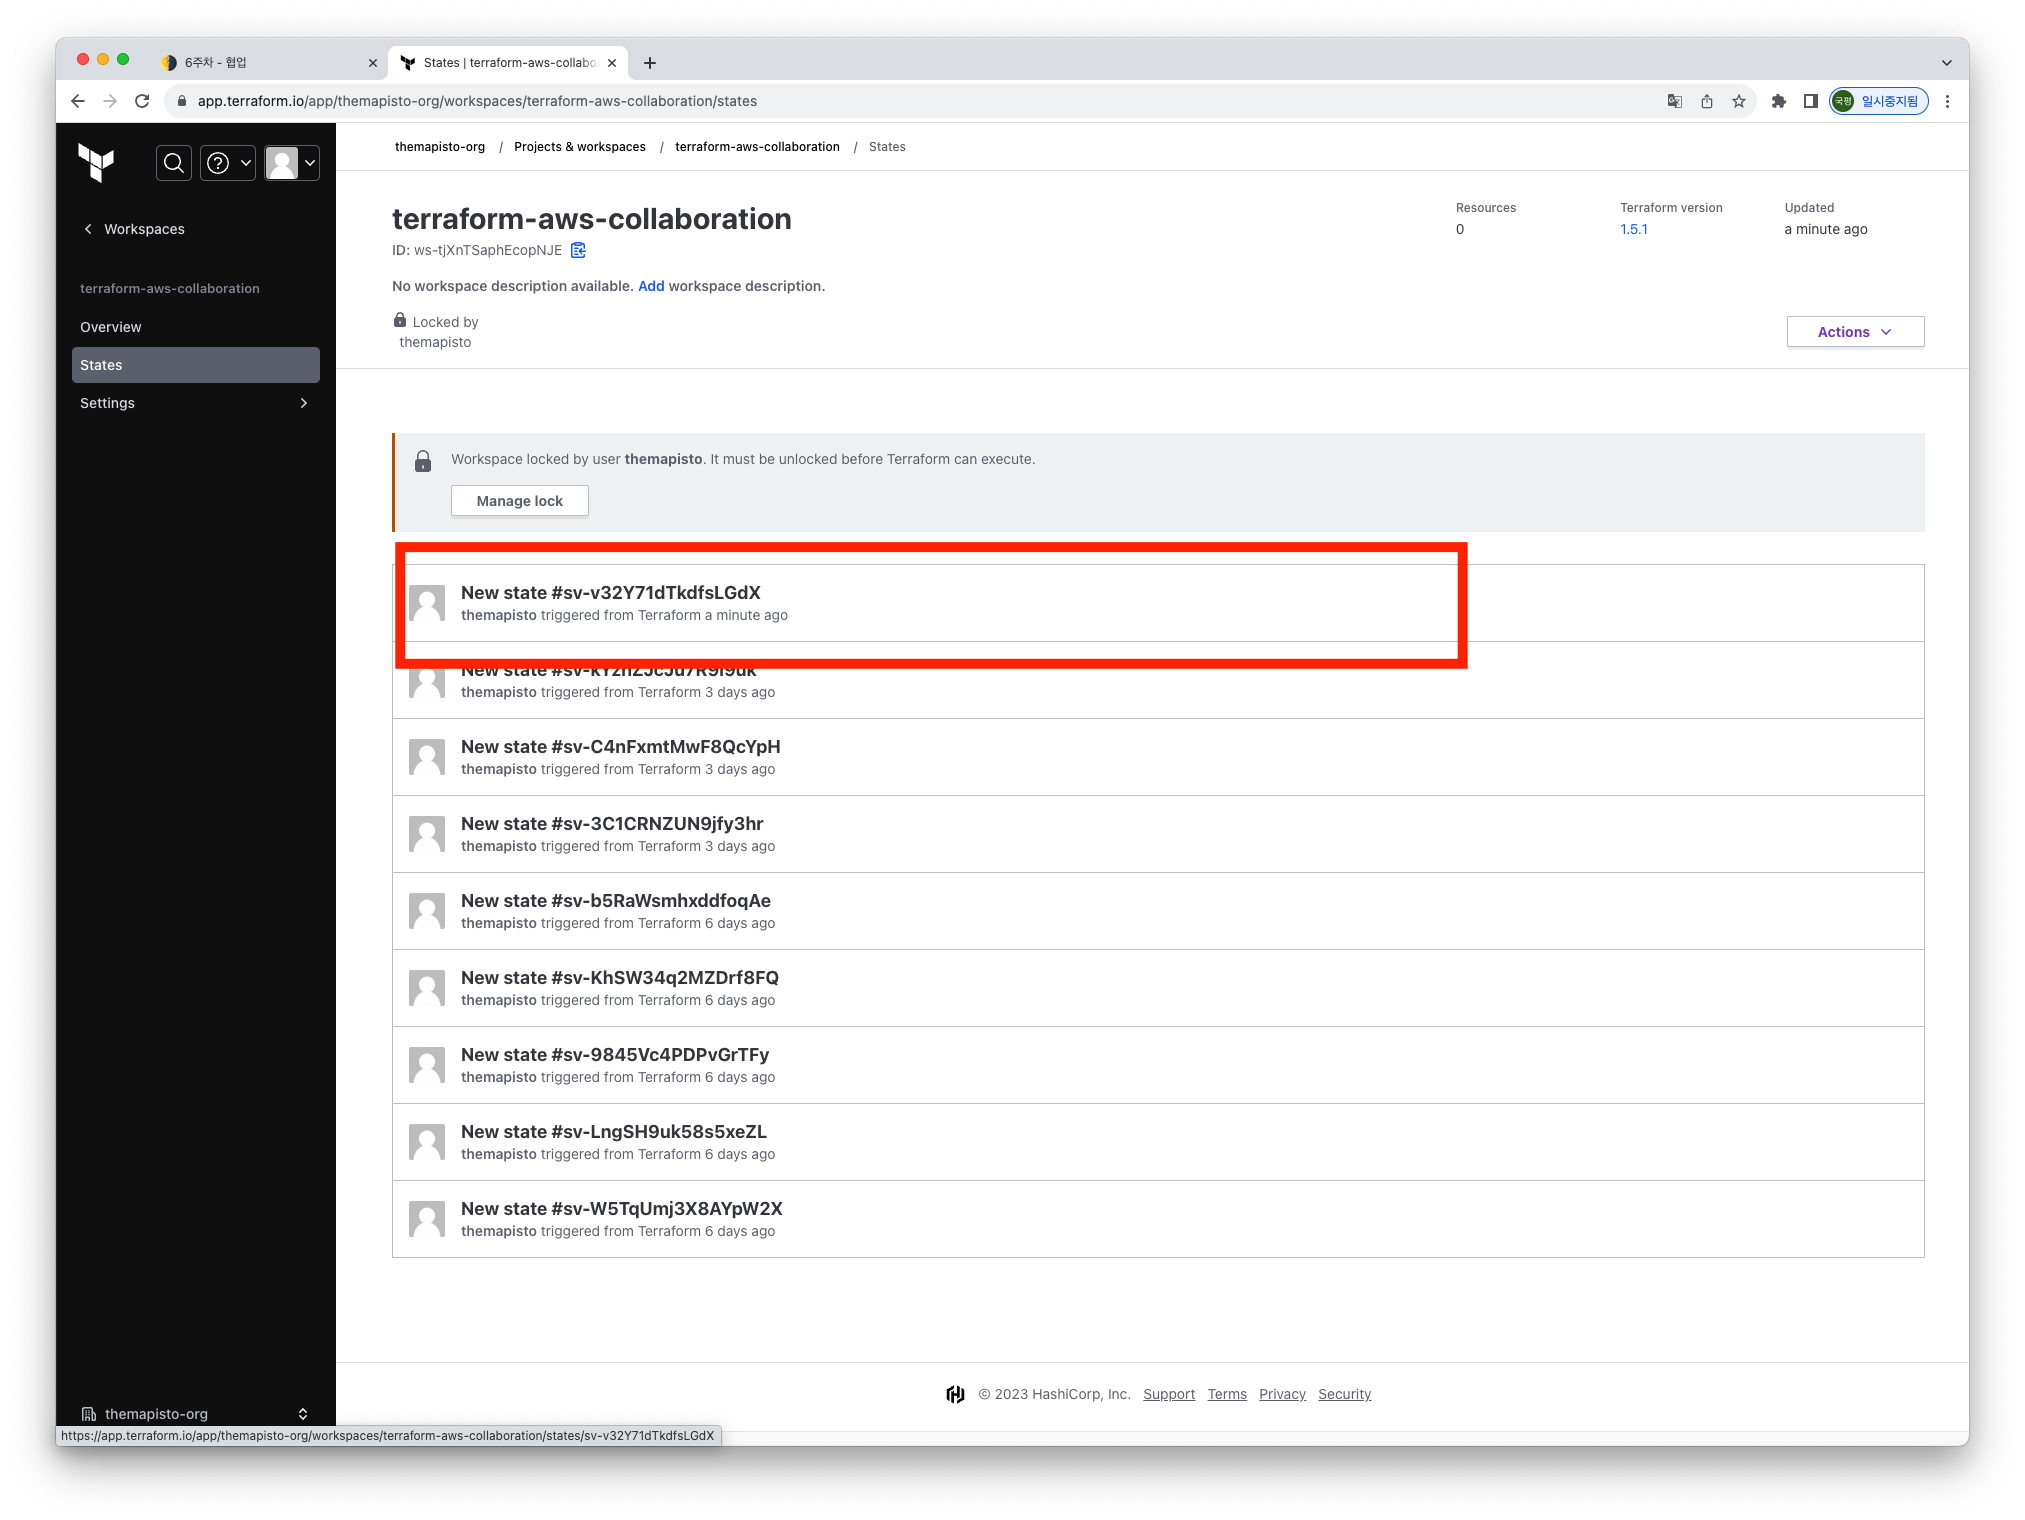
3. TFC 실행 해보기
- 테라폼 init 시 생성되는 모듈들
kpkim@gimgugpyeong-ui-MacBookPro terraform-aws-collaboration-tom % terraform init

Initializing Terraform Cloud...

Initializing provider plugins...
- Reusing previous version of hashicorp/aws from the dependency lock file
- Reusing previous version of hashicorp/null from the dependency lock file
- Reusing previous version of hashicorp/tls from the dependency lock file
- Using previously-installed hashicorp/aws v4.67.0
- Using previously-installed hashicorp/null v3.2.1
- Using previously-installed hashicorp/tls v4.0.4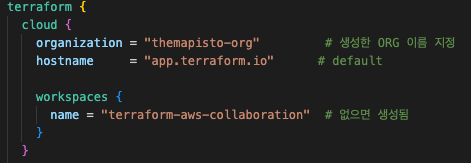
- 설치된 플러그인 확인

- 테라폼 apply 실행 시
kpkim@gimgugpyeong-ui-MacBookPro terraform-aws-collaboration-tom % terraform apply -auto-approve
var.prefix
  This prefix will be included in the name of most resources.

  Enter a value: dev

data.aws_ami.ubuntu: Reading...
data.aws_ami.ubuntu: Read complete after 0s [id=ami-0419dc605b6dde61f]

Terraform used the selected providers to generate the following execution plan. Resource actions are
indicated with the following symbols:
  + create

Terraform will perform the following actions:
Plan: 12 to add, 0 to change, 0 to destroy.- state 생성 되는것을 확인
https://themapisto.tistory.com/212
✔️ 다음 포스팅에서 조금 더 알아봅시다.
'DevOps > Terraform' 카테고리의 다른 글
| [T102 7주차] (19) 테라폼 Cloud 사용법(2) (0) | 2023.08.16 |
|---|---|
| [T102 7주차] (18) Github Action과 TFC 연동 방법 (0) | 2023.08.14 |
| [T102 6주차] (16) 테라폼 협업 ( 깃Pull Request 통한 협업 ) (0) | 2023.08.08 |
| (15) 테라폼 모듈 (3) VPC & EKS (0) | 2023.07.25 |
| [T102 4주차] (14) 테라폼 모듈 (2) (2) | 2023.07.24 |


