EKS SaaS GitOps 워크샵 — Terraform + GitHub Actions + ArgoCD 재구성 가이드
원본 워크샵(
Flux.md, AWS Solutions Library Sampleeks-saas-gitops)은
Gitea + Flux v2 + Tofu Controller + Argo Workflows 조합으로 구성되어 있습니다.
이 가이드는 동일한 학습 목표(멀티테넌트 SaaS, 셀프서비스 인프라, 티어 전략, 이벤트 드리븐 온보딩)를
AWS EKS + Terraform + GitHub Actions + ArgoCD 스택으로 재현하는 단계별 실습 가이드입니다.
0. 학습 목표 및 아키텍처 매핑
0.1 학습 목표
원본 워크샵과 동일하게 다음을 직접 구현·검증합니다.
- GitOps 4원칙(Declarative / Versioned / Pulled / Continuously Reconciled)을 ArgoCD로 재현
- 단일 Helm 차트 +
values분기로 SaaS 티어(Basic/Advanced/Premium) 동시 운영 - 테넌트별 SQS·DynamoDB·IRSA 등 AWS 리소스를 IaC로 자동 프로비저닝
- 이벤트(또는 PR/Workflow Dispatch) 한 번으로 테넌트 온보딩/오프보딩 완성
0.2 도구 매핑
| 원본 워크샵 (Flux 기반) | 본 가이드 (ArgoCD 기반) | 비고 |
|---|---|---|
| Gitea | GitHub (App/Infra Repo) | OAuth/PAT/SSH 키 사용 |
Flux GitRepository / Kustomization |
ArgoCD Application / ApplicationSet |
App-of-Apps 패턴 |
Flux HelmRelease |
ArgoCD Application(source.helm) 또는 Helm Chart Repo |
ECR Helm OCI 그대로 사용 |
| Flux Image Automation | Argo CD Image Updater | ECR write-back |
| Tofu Controller (Terraform CRD) | GitHub Actions + Terraform Cloud/S3 Backend | PR 기반 plan/apply |
| Argo Events + SQS Sensor | GitHub Actions workflow_dispatch / repository_dispatch |
외부 트리거는 EventBridge → GH API |
| Argo Workflows 온보딩 템플릿 | Reusable GitHub Actions Workflow | 템플릿 변수 치환 + 자동 PR |
| Gitea Actions (이미지 빌드) | GitHub Actions (docker/build-push-action) |
OIDC로 ECR 푸시 |
0.3 최종 아키텍처(텍스트 다이어그램)

┌────────────────────────── GitHub Org ──────────────────────────┐
│  ┌─────────────────────┐   ┌─────────────────────┐             │
│  │ infra-repo          │   │ apps-repo (GitOps)  │             │
│  │  modules/           │   │  bootstrap/         │             │
│  │   eks, ecr, network │   │   app-of-apps.yaml  │             │
│  │  envs/prd           │   │  platform/          │             │
│  │                     │   │   alb, karpenter…   │             │
│  │  .github/workflows  │   │  apps/              │             │
│  │   tf-plan.yml       │   │   pool-1, tenant-*  │             │
│  │   tf-apply.yml      │   │  helm-charts/       │             │
│  │   tenant-onboard.yml│   │   tenant-chart/     │             │
│  └─────────┬───────────┘   └──────────┬──────────┘             │
│            │ OIDC                       │                       │
└────────────┼──────────────────────────┼───────────────────────┘
             ▼                          ▼  (ArgoCD watches)
   ┌─────────────────────────────────────────────────────────────┐
   │                       AWS Account                           │
   │  ┌────────────┐  ┌──────────────────────────────────────┐   │
   │  │  ECR       │  │             EKS Cluster              │   │
   │  │ images +   │  │  ┌──────────────┐  ┌──────────────┐  │   │
   │  │ helm OCI   │◄─┼──│  ArgoCD      │  │ App workloads │  │   │
   │  └────────────┘  │  │ + ImgUpdater │  │ pool-1 / t-1 │  │   │
   │                  │  └──────────────┘  └──────────────┘  │   │
   │  ┌────────────┐  └──────────────────────────────────────┘   │
   │  │ DynamoDB / SQS / IAM (테넌트별, GitHub Actions가 생성)│   │
   │  └────────────┘                                              │
   └──────────────────────────────────────────────────────────────┘
1. 사전 요구 사항
다음이 준비되어 있어야 합니다.
- AWS 계정 + IAM 사용자(또는 SSO)로
aws sts get-caller-identity가능 - 로컬 도구:
aws-cli >= 2.15,terraform >= 1.6,kubectl >= 1.30,helm >= 3.14,git,jq - GitHub Organization (또는 개인 계정)과 두 개의 빈 저장소:
infra-repo,apps-repo - (선택) Terraform State 백엔드용 S3 버킷 + DynamoDB Lock 테이블
본 가이드는
ap-northeast-2(서울) 리전, EKS 1.35 기준입니다. 다른 리전을 쓰시려면region변수만 바꾸세요.
export AWS_REGION=ap-northeast-2
export PROJECT=eks-saas-gitops
export GH_ORG=koomegazone
2. 저장소 구조 설계
2.1 infra-repo — Terraform IaC + CI/CD
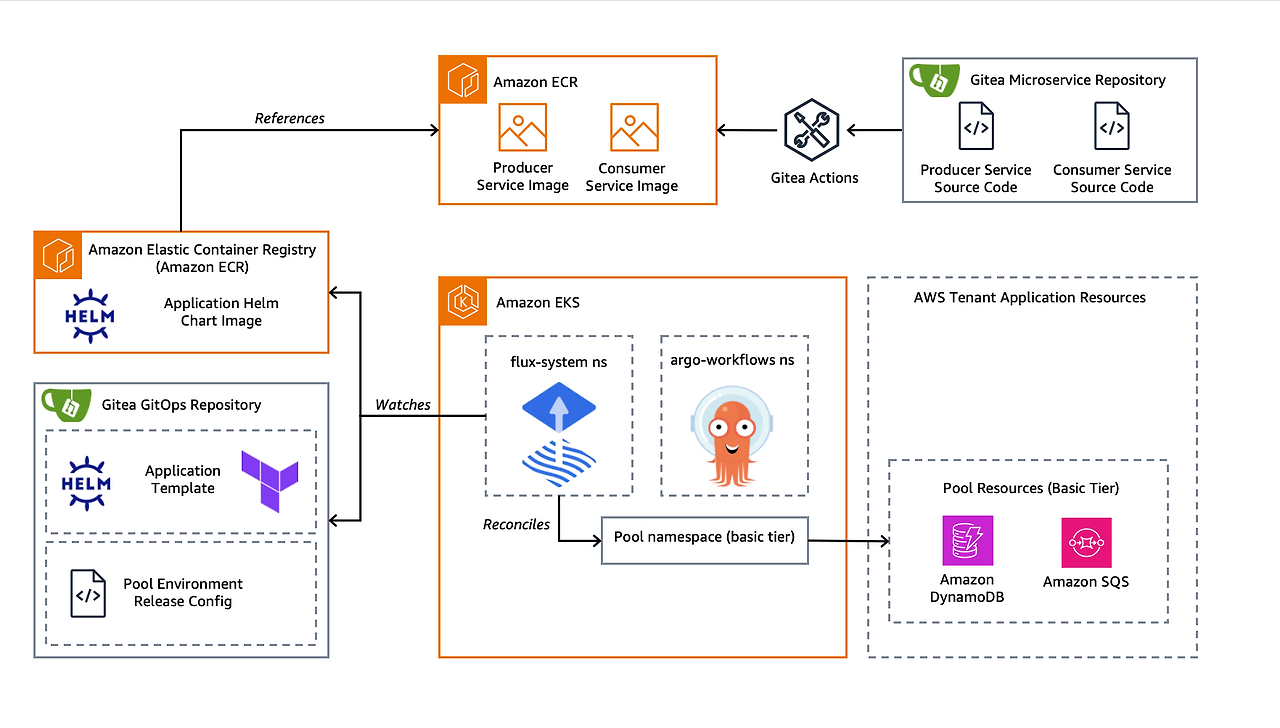
크게 어려운건 없다. 그냥 cicd를 하나로 연결시킨다 라는 요구사항만 생각하면
심플하다.
인프라 repo는 테라폼 모듈이 있고 eks 클러스터와 SQS, DynamDB, IAM , IRSA 등을 배포한다.
apps-repo는 ArgoCD, helm 등 코드가 있다.
코드는 여기 다 있음
- https://github.com/koomegazone/infra-repo
- https://github.com/koomegazone/apps-repo
- [GitHub - koomegazone/apps-repo
Contribute to koomegazone/apps-repo development by creating an account on GitHub.
github.com](https://github.com/koomegazone/apps-repo)
infra-repo/
├── modules/
│   ├── network/                # VPC, Subnet, NAT
│   ├── eks/                    # EKS, NodeGroup, IRSA OIDC Provider
│   ├── ecr/                    # ECR (producer, consumer, payments, helm-tenant-chart)
│   ├── argocd-bootstrap/       # ArgoCD Helm 설치 + Image Updater
│   └── tenant-apps/            # ★ 원본 워크샵의 tenant-apps 모듈 동일
│       ├── main.tf             # SQS, DynamoDB, IAM/IRSA
│       ├── variables.tf        # tenant_id, enable_producer, enable_consumer
│       └── outputs.tf
├── envs/
│   └── prd/
│       ├── backend.tf          # S3 backend
│       ├── main.tf             # 위 모듈 호출
│       ├── tenants.auto.tfvars # ★ 테넌트 목록 (자동 생성됨)
│       └── variables.tf
├── .github/
│   └── workflows/
│       ├── tf-plan.yml          # PR 시 plan 코멘트
│       ├── tf-apply.yml         # main 머지 시 apply
│       └── tenant-onboard.yml   # workflow_dispatch 로 테넌트 추가/제거
└── README.md
2.2 apps-repo — ArgoCD GitOps 매니페스트
apps-repo/
├── bootstrap/
│   └── root-app.yaml             # ArgoCD App-of-Apps "root"
├── platform/                     # 클러스터 공통 (Karpenter, ALB Controller, Metrics-Server, Kubecost…)
│   ├── kustomization.yaml
│   └── *.yaml                    # ApplicationSet 또는 Application
├── tenants/
│   ├── basic/
│   │   ├── pool-1.yaml           # 공유 환경 HelmRelease 대체
│   │   └── tenant-2.yaml
│   ├── advanced/
│   │   └── tenant-3.yaml
│   └── premium/
│       └── tenant-1.yaml
├── tier-templates/               # ★ 원본 tier-templates 동등 (ArgoCD Application 형태)
│   ├── basic_env_template.yaml
│   ├── basic_tenant_template.yaml
│   ├── advanced_tenant_template.yaml
│   └── premium_tenant_template.yaml
├── helm-charts/
│   ├── helm-tenant-chart/        # 워크샵 helm-tenant-chart 그대로 이식
│   └── application-chart/
└── .github/workflows/
    └── tenant-onboard.yml        # 템플릿 → tenants/* 로 PR 생성
핵심 패턴:
infra-repo에는 “사람만 만질 수 있는 AWS 리소스” 를 두고,apps-repo에는 “ArgoCD가 자동으로 동기화하는 K8s 리소스” 를 둡니다.
두 저장소 모두 GitHub Actions로 자동화됩니다.
3. STEP 1 — Terraform으로 플랫폼 부트스트랩
원본 워크샵의 “0. 실습 환경 구성” + “1-2 Terraform 모듈 직접 테스트” 단계를 GitHub Actions가 대신 수행합니다.
3.1 Terraform State 백엔드 (한 번만 수동 실행)
# infra-repo/envs/prd/backend.tf
terraform {
  required_version = ">= 1.6"
  backend "s3" {
    bucket         = "eks-saas-gitops-tfstate-<ACCOUNT_ID>"
    key            = "prd/terraform.tfstate"
    region         = "ap-northeast-2"
    dynamodb_table = "eks-saas-gitops-tflock"
    encrypt        = true
  }
}
# 백엔드 리소스 생성 (1회)
aws s3api create-bucket --bucket eks-saas-gitops-tfstate-$(aws sts get-caller-identity --query Account --output text) \
--region ap-northeast-2 --create-bucket-configuration LocationConstraint=ap-northeast-2
aws dynamodb create-table --table-name eks-saas-gitops-tflock \
--attribute-definitions AttributeName=LockID,AttributeType=S \
--key-schema AttributeName=LockID,KeyType=HASH \
--billing-mode PAY_PER_REQUEST --region ap-northeast-2
###만들고 나면 tfvars에 다음과 같이 업데이트 github 주소 필요
region = "ap-northeast-2"
project = "eks-saas-gitops"
cluster_version = "1.30"
github_org = "koomegazone"
infra_repo_name = "infra-repo"
apps_repo_name = "apps-repo"
apps_repo_url = "https://github.com/koomegazone/apps-repo.git"3.2 핵심 Terraform 모듈 (요약)
modules/eks/main.tf — terraform-aws-modules/eks/aws 기반으로 OIDC, IRSA Provider 자동 활성화:
module "eks" {
  source  = "terraform-aws-modules/eks/aws"
  version = "~> 20.20"

  cluster_name    = var.cluster_name
  cluster_version = "1.30"
  cluster_endpoint_public_access = true

  enable_irsa = true
  enable_cluster_creator_admin_permissions = true

  vpc_id     = var.vpc_id
  subnet_ids = var.private_subnet_ids

  eks_managed_node_groups = {
    apps = {
      instance_types = ["m6i.large"]
      min_size       = 2
      desired_size   = 3
      max_size       = 6
      labels         = { "node-type" = "applications" }
      taints = [{ key = "applications", value = "true", effect = "NO_SCHEDULE" }]
    }
  }

  tags = { Project = var.project }
}
modules/tenant-apps/main.tf — 원본 워크샵의 tenant-apps 모듈을 거의 그대로 사용:
variable "tenant_id"       { type = string }
variable "enable_producer" { type = bool   default = true }
variable "enable_consumer" { type = bool   default = true }

resource "random_string" "suffix" {
  length  = 3
  special = false
  upper   = false
}

# DynamoDB
resource "aws_dynamodb_table" "consumer_ddb" {
  count        = var.enable_consumer ? 1 : 0
  name         = "consumer-${var.tenant_id}-${random_string.suffix.result}"
  billing_mode = "PAY_PER_REQUEST"
  hash_key     = "tenant_id"
  range_key    = "message_id"
  attribute { name = "tenant_id"  type = "S" }
  attribute { name = "message_id" type = "S" }
  tags        = { Name = var.tenant_id }
}

# SQS
resource "aws_sqs_queue" "consumer_sqs" {
  count = var.enable_consumer ? 1 : 0
  name  = "consumer-${var.tenant_id}-${random_string.suffix.result}"
  tags  = { Name = var.tenant_id }
}

# IRSA — IAM Role for ServiceAccount
data "aws_eks_cluster" "this" { name = var.cluster_name }

module "consumer_irsa_role" {
  count   = var.enable_consumer ? 1 : 0
  source  = "terraform-aws-modules/iam/aws//modules/iam-role-for-service-accounts-eks"
  version = "~> 5.30"

  role_name = "consumer-role-${var.tenant_id}"
  role_policy_arns = { policy = aws_iam_policy.consumer[0].arn }
  oidc_providers = {
    main = {
      provider_arn               = data.aws_eks_cluster.this.identity[0].oidc[0].issuer
      namespace_service_accounts = ["${var.tenant_id}:${var.tenant_id}-consumer"]
    }
  }
}
# (producer_irsa_role 동일 패턴, enable_producer 분기)
envs/prd/main.tf — 테넌트 리스트를 for_each로 펼쳐 인스턴스화:
locals {
  tenants = jsondecode(file("${path.module}/tenants.json"))
  # tenants.json 예: [{"id":"tenant-1","tier":"premium"},{"id":"tenant-2","tier":"basic"}, ...]
}

module "tenant_apps" {
  source   = "../../modules/tenant-apps"
  for_each = { for t in local.tenants : t.id => t }

  tenant_id       = each.value.id
  enable_producer = each.value.tier != "advanced"  # advanced는 producer 공유
  enable_consumer = true
  cluster_name    = module.eks.cluster_name
}
원본의
Tofu Controller + Terraform CRD흐름은tenants.json파일 변경 → GitHub Actions tf-apply 로 동일한 “Git 파일 추가 = AWS 리소스 자동 프로비저닝” 패턴이 됩니다.
4. STEP 2 — GitHub Actions CI/CD
4.1 OIDC 기반 IAM Role (Terraform이 미리 만들어 두기)
GitHub Actions가 키 없이 AWS에 접근하도록 OIDC Provider + Role을 생성합니다. (모듈로 분리 권장)
resource "aws_iam_openid_connect_provider" "github" {
  url             = "https://token.actions.githubusercontent.com"
  client_id_list  = ["sts.amazonaws.com"]
  thumbprint_list = ["6938fd4d98bab03faadb97b34396831e3780aea1"]
}

resource "aws_iam_role" "gha_terraform" {
  name = "gha-terraform"
  assume_role_policy = jsonencode({
    Version = "2012-10-17",
    Statement = [{
      Effect = "Allow",
      Principal = { Federated = aws_iam_openid_connect_provider.github.arn },
      Action = "sts:AssumeRoleWithWebIdentity",
      Condition = {
        StringEquals = { "token.actions.githubusercontent.com:aud" = "sts.amazonaws.com" },
        StringLike   = { "token.actions.githubusercontent.com:sub" = "repo:${var.gh_org}/infra-repo:*" }
      }
    }]
  })
}

resource "aws_iam_role_policy_attachment" "gha_admin" {
  role       = aws_iam_role.gha_terraform.name
  policy_arn = "arn:aws:iam::aws:policy/AdministratorAccess"  # PoC. 운영은 권한 최소화
}
4.2 tf-plan.yml — PR Plan 코멘트
name: tf-plan
on:
  pull_request:
    paths: [ 'envs/prd/**', 'modules/**' ]

permissions:
  id-token: write
  contents: read
  pull-requests: write

jobs:
  plan:
    runs-on: ubuntu-latest
    defaults: { run: { working-directory: envs/prd } }
    steps:
      - uses: actions/checkout@v4
      - uses: aws-actions/configure-aws-credentials@v4
        with:
          role-to-assume: arn:aws:iam::${{ secrets.AWS_ACCOUNT_ID }}:role/gha-terraform
          aws-region: ap-northeast-2
      - uses: hashicorp/setup-terraform@v3
        with: { terraform_version: 1.7.5 }
      - run: terraform init
      - id: plan
        run: terraform plan -no-color -out=tfplan | tee plan.txt
      - uses: actions/github-script@v7
        with:
          script: |
            const fs = require('fs');
            const body = '```hcl\n' + fs.readFileSync('envs/prd/plan.txt','utf8').slice(0, 60000) + '\n```';
            github.rest.issues.createComment({
              ...context.repo, issue_number: context.issue.number, body
            });
4.3 tf-apply.yml — main 머지 시 apply
name: tf-apply
on:
  push:
    branches: [ main ]
    paths: [ 'envs/prd/**', 'modules/**' ]

permissions: { id-token: write, contents: read }

jobs:
  apply:
    runs-on: ubuntu-latest
    defaults: { run: { working-directory: envs/prd } }
    environment: prd                # GitHub 환경 보호 규칙(Approval) 권장
    steps:
      - uses: actions/checkout@v4
      - uses: aws-actions/configure-aws-credentials@v4
        with:
          role-to-assume: arn:aws:iam::${{ secrets.AWS_ACCOUNT_ID }}:role/gha-terraform
          aws-region: ap-northeast-2
      - uses: hashicorp/setup-terraform@v3
      - run: terraform init
      - run: terraform apply -auto-approve
4.4 마이크로서비스 빌드 → ECR 푸시
apps-repo/services/{producer,consumer,payments}/.github/workflows/build.yml (또는 mono-repo 구조):
name: build-and-push
on:
  push:
    branches: [ main ]
    paths: [ 'services/**' ]

permissions: { id-token: write, contents: read }

jobs:
  build:
    runs-on: ubuntu-latest
    strategy:
      matrix:
        service: [producer, consumer, payments]
    steps:
      - uses: actions/checkout@v4
      - uses: aws-actions/configure-aws-credentials@v4
        with:
          role-to-assume: arn:aws:iam::${{ secrets.AWS_ACCOUNT_ID }}:role/gha-ecr
          aws-region: ap-northeast-2
      - uses: aws-actions/amazon-ecr-login@v2
        id: ecr
      - name: Build & Push
        uses: docker/build-push-action@v6
        with:
          context: services/${{ matrix.service }}
          push: true
          tags: |
            ${{ steps.ecr.outputs.registry }}/${{ matrix.service }}:prd-${{ github.run_number }}
            ${{ steps.ecr.outputs.registry }}/${{ matrix.service }}:latest
이미지 태그 자동 갱신은 ArgoCD Image Updater 가 ECR을 폴링하여
apps-repo로 PR/Commit합니다(STEP 4 참고).
5. STEP 3 — ArgoCD 설치 및 App-of-Apps 부트스트랩
5.1 ArgoCD를 Terraform으로 설치 (권장)
modules/argocd-bootstrap/main.tf:
resource "kubernetes_namespace" "argocd" {
  metadata { name = "argocd" }
}

resource "helm_release" "argocd" {
  name       = "argocd"
  namespace  = kubernetes_namespace.argocd.metadata[0].name
  repository = "https://argoproj.github.io/argo-helm"
  chart      = "argo-cd"
  version    = "7.6.10"

  values = [yamlencode({
    server = {
      service = { type = "LoadBalancer" }
    }
    configs = {
      cm = {
        "timeout.reconciliation" = "60s"
        "resource.exclusions"    = "" # 필요시
      }
      repositories = {
        apps = {
          url      = "https://github.com/${var.gh_org}/apps-repo"
          type     = "git"
          username = var.github_user
          password = var.github_token  # ★ 운영은 ExternalSecrets
        }
      }
    }
  })]
}

# Argo CD Image Updater
resource "helm_release" "image_updater" {
  name       = "argocd-image-updater"
  namespace  = kubernetes_namespace.argocd.metadata[0].name
  repository = "https://argoproj.github.io/argo-helm"
  chart      = "argocd-image-updater"
  version    = "0.11.0"

  values = [yamlencode({
    config = {
      registries = [{
        name     = "ECR"
        api_url  = "https://${var.account_id}.dkr.ecr.${var.region}.amazonaws.com"
        prefix   = "${var.account_id}.dkr.ecr.${var.region}.amazonaws.com"
        ping     = true
        credentials = "ext:/scripts/ecr-login.sh"
        credexpire = "10h"
      }]
    }
  })]
}
설치 후 초기 비밀번호:
aws eks update-kubeconfig --name $PROJECT --region $AWS_REGION
kubectl -n argocd get secret argocd-initial-admin-secret -o jsonpath='{.data.password}' | base64 -d; echo
ARGO_URL=$(kubectl -n argocd get svc argocd-server -o jsonpath='{.status.loadBalancer.ingress[0].hostname}')
echo "https://$ARGO_URL"
5.2 Root Application (App-of-Apps)
원본 워크샵의 Flux kustomization/flux-system 역할을 ArgoCD Application이 대신합니다.
# apps-repo/bootstrap/root-app.yaml
apiVersion: argoproj.io/v1alpha1
kind: Application
metadata:
  name: root
  namespace: argocd
  finalizers: [resources-finalizer.argocd.argoproj.io]
spec:
  project: default
  source:
    repoURL: https://github.com/<GH_ORG>/apps-repo
    path: bootstrap/children
    targetRevision: main
    directory: { recurse: true }
  destination:
    namespace: argocd
    server: https://kubernetes.default.svc
  syncPolicy:
    automated: { prune: true, selfHeal: true }
bootstrap/children/ 폴더에는 다음과 같은 자식 Application YAML들을 둡니다.
# bootstrap/children/platform.yaml
apiVersion: argoproj.io/v1alpha1
kind: Application
metadata: { name: platform, namespace: argocd }
spec:
  project: default
  source:
    repoURL: https://github.com/<GH_ORG>/apps-repo
    path: platform
    targetRevision: main
  destination: { server: https://kubernetes.default.svc, namespace: kube-system }
  syncPolicy: { automated: { prune: true, selfHeal: true } }
---
# bootstrap/children/tenants.yaml — ApplicationSet 으로 모든 테넌트 자동 발견
apiVersion: argoproj.io/v1alpha1
kind: ApplicationSet
metadata: { name: tenants, namespace: argocd }
spec:
  generators:
    - git:
        repoURL: https://github.com/<GH_ORG>/apps-repo
        revision: main
        directories:
          - path: tenants/*/*
  template:
    metadata:
      name: '{{path[2]}}'             # tenant-1, tenant-2 ...
    spec:
      project: default
      source:
        repoURL: https://github.com/<GH_ORG>/apps-repo
        path: '{{path}}'
        targetRevision: main
      destination:
        server: https://kubernetes.default.svc
        namespace: '{{path[2]}}'
      syncPolicy:
        automated: { prune: true, selfHeal: true }
        syncOptions: [CreateNamespace=true]
부트스트랩 적용:
kubectl apply -f apps-repo/bootstrap/root-app.yaml
argocd app list           # root, platform, tenants(ApplicationSet)
argocd app sync root체크포인트:
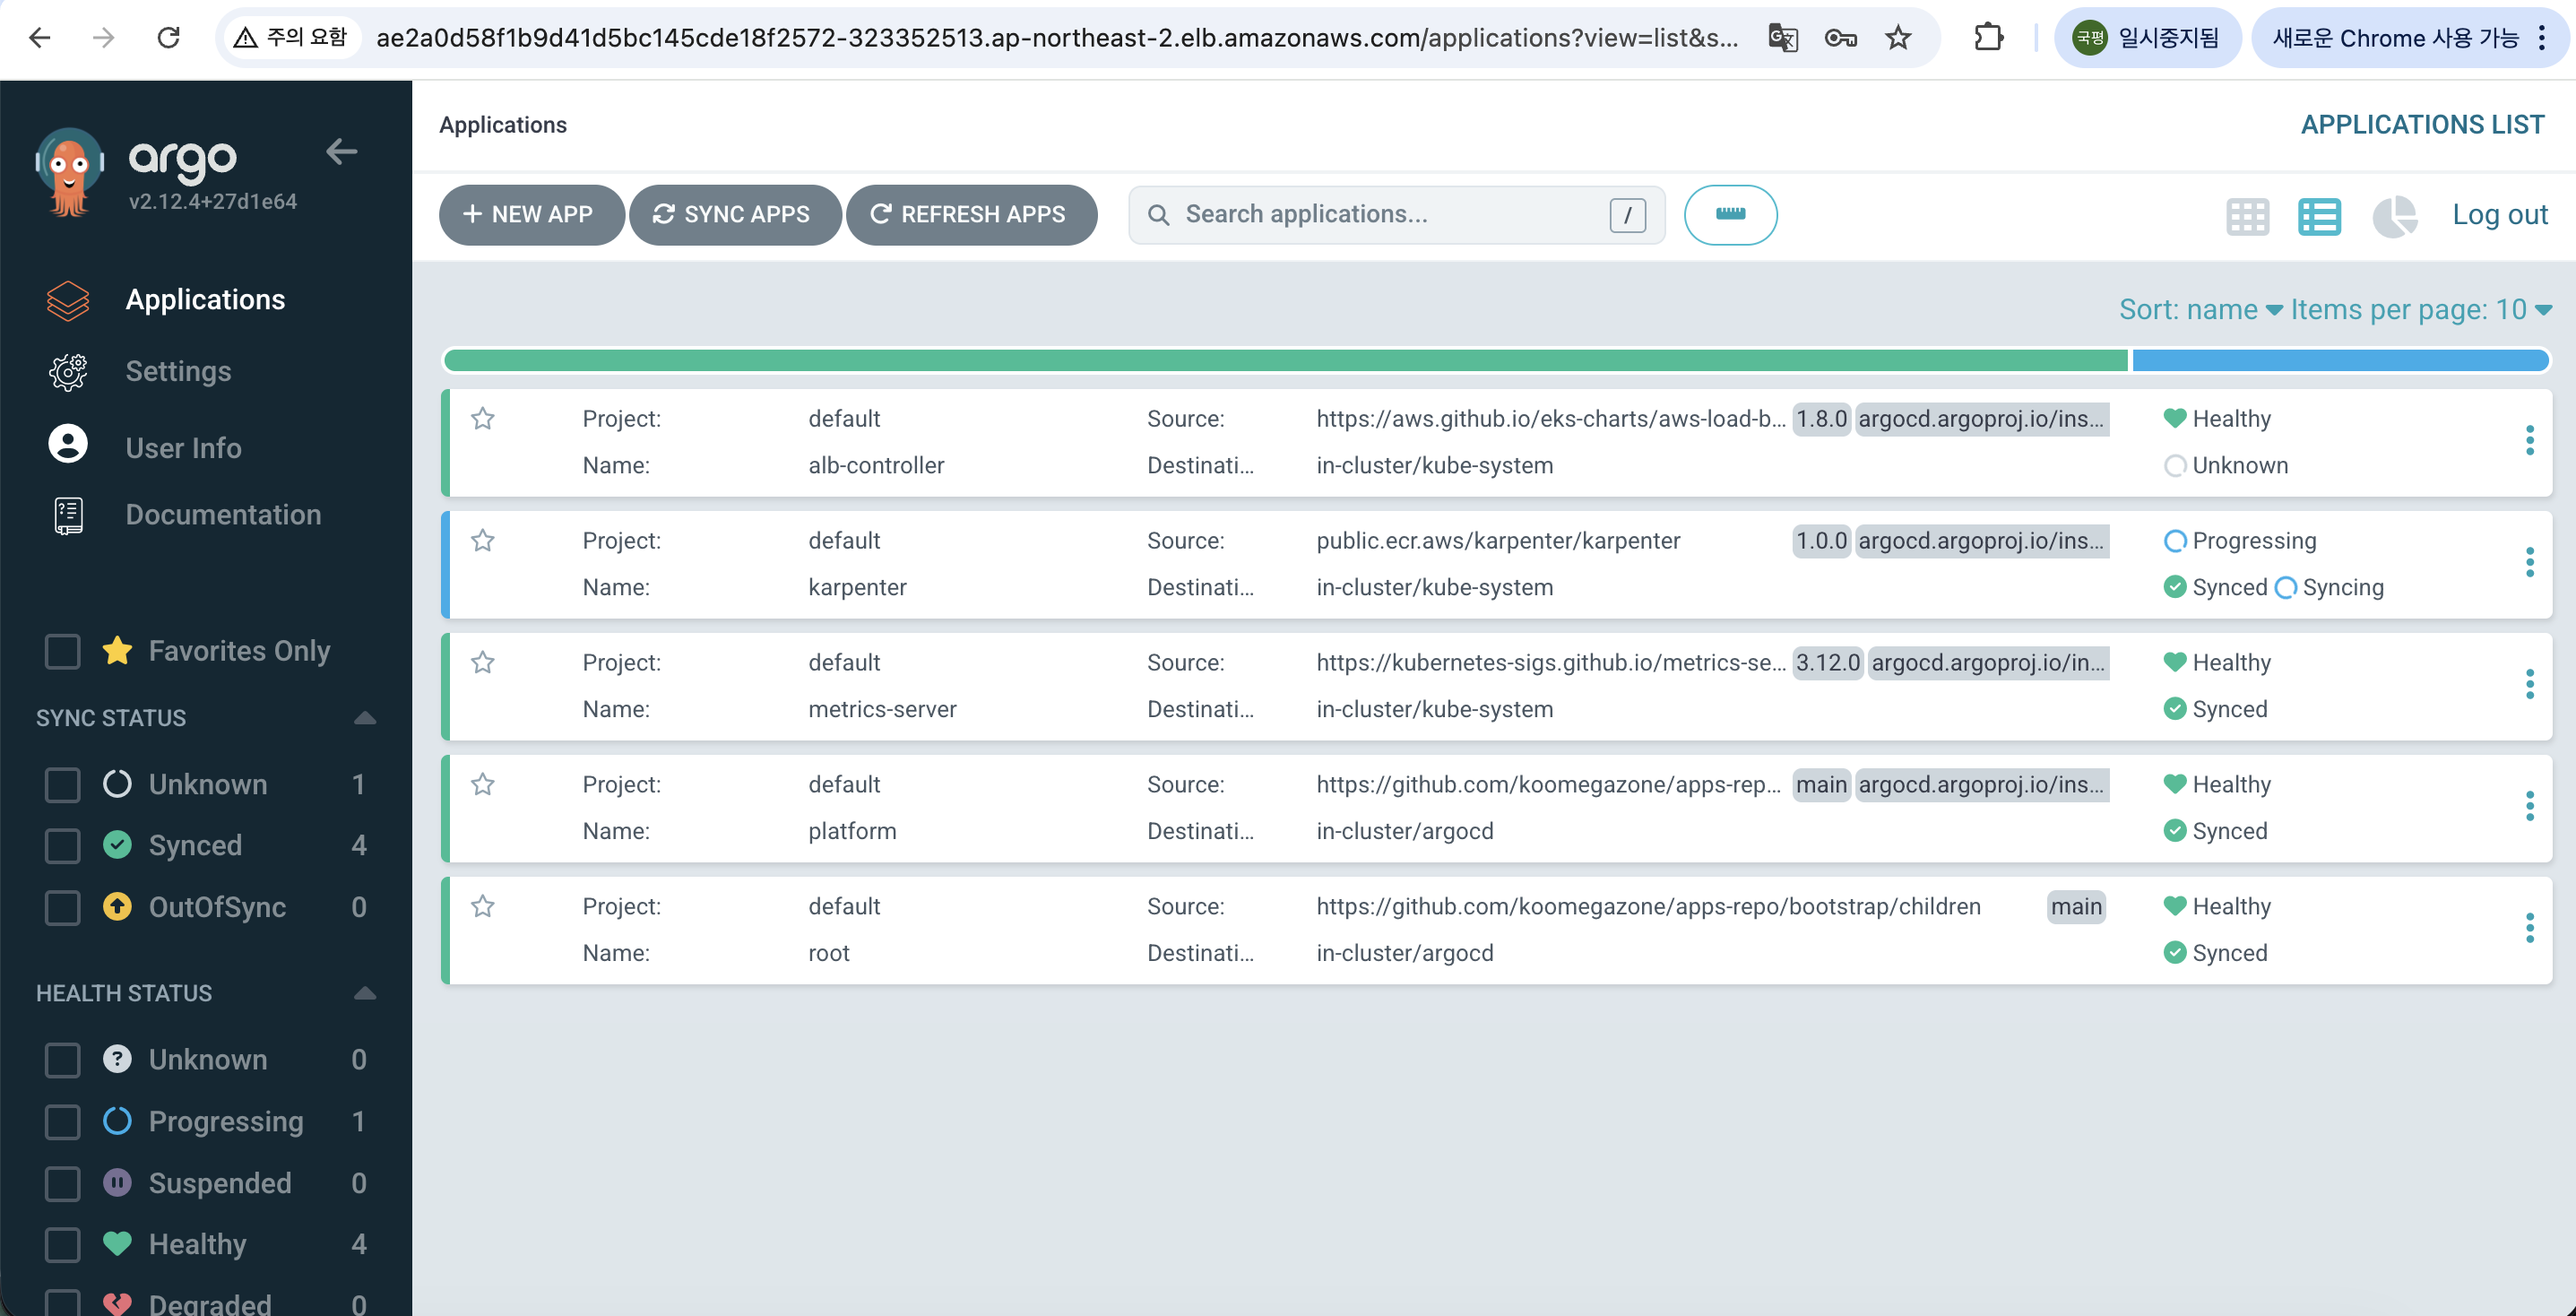
argocd app list에root,platform, 그리고 ApplicationSet이 자동 생성한tenant-*Application 들이 모두Synced/Healthy인지 확인.
6. STEP 4 — 실습 1: 셀프서비스 인프라 (Tofu Controller 대체)
원본의 “Git 파일 추가 → tf-controller 가 SQS/DDB/IRSA 생성” 흐름을
GitHub Actions가 동일하게 흉내냅니다.
테넌트 온보딩 자동화를 재현해 볼 단계입니다.
6.1 “수동 실행” 원본 시나리오의 재현
# infra-repo/envs/prd/tenants.json 에 한 줄 추가
git checkout -b feat/example-tenant
cat tenants.json | jq '. += [{"id":"example-tenant","tier":"premium"}]' > _tmp && mv _tmp tenants.json
git add tenants.json && git commit -m "Add example-tenant"
git push origin feat/example-tenant
gh pr create --fill
→ GitHub Actions tf-plan.yml 이 PR에 plan을 코멘트로 답니다 (Plan: 11 to add, 0 to change, 0 to destroy).
# 리뷰 후 머지하면 tf-apply.yml 가 자동 실행
gh pr merge --squash
6.2 검증 (원본 워크샵의 aws dynamodb list-tables 단계와 동일)
aws dynamodb list-tables  | grep example-tenant
aws sqs list-queues       | grep example-tenant
aws iam get-role --role-name consumer-role-example-tenant
6.3 “파일 삭제 = 리소스 정리”
git checkout -b chore/remove-example
jq 'map(select(.id != "example-tenant"))' tenants.json > _tmp && mv _tmp tenants.json
git commit -am "Remove example-tenant" && git push
gh pr create --fill && gh pr merge --squash
# tf-apply 가 destroy 11 resources 실행
이 한 줄 변경이 원본 워크샵 “1-2 Tofu 컨트롤러 통합 →
kubectl get secret tfplan-default-example-tenant” 와 의미적으로 동일합니다.
차이점은 상태 저장 위치가 K8s Secret(tfplan-*,tfstate-*) → S3 backend 로 바뀐 것뿐입니다.
7. STEP 5 — 실습 2: 멀티테넌트 티어 전략 (Helm)
7.1 Helm 차트는 그대로 이식
원본 helm-charts/helm-tenant-chart 디렉터리(Chart.yaml, values.yaml, templates/{deployment,service,ingress,hpa,serviceaccount}.yaml)를apps-repo/helm-charts/helm-tenant-chart/ 에 그대로 옮깁니다.
# (선택) ECR Helm OCI Repo로 푸시
helm package apps-repo/helm-charts/helm-tenant-chart -d /tmp
helm push /tmp/helm-tenant-chart-0.0.1.tgz oci://${ACCOUNT_ID}.dkr.ecr.${AWS_REGION}.amazonaws.com
7.2 티어 템플릿 (ArgoCD Application 형식)
apps-repo/tier-templates/premium_tenant_template.yaml (원본 Flux HelmRelease 동등):
apiVersion: argoproj.io/v1alpha1
kind: Application
metadata:
  name: {TENANT_ID}-premium
  namespace: argocd
spec:
  project: default
  source:
    repoURL: oci://{ACCOUNT_ID}.dkr.ecr.{REGION}.amazonaws.com
    chart: helm-tenant-chart
    targetRevision: "{RELEASE_VERSION}.x"
    helm:
      releaseName: {TENANT_ID}-premium
      values: |
        tenantId: {TENANT_ID}
        apps:
          producer:
            enabled: true
            ingress: { enabled: true }
            image:
              tag: "0.1"  # argocd-image-updater.argoproj.io/image-list 로 자동 업데이트
          consumer:
            enabled: true
            ingress: { enabled: true }
            image: { tag: "0.1" }
  destination:
    server: https://kubernetes.default.svc
    namespace: {TENANT_ID}
  syncPolicy:
    automated: { prune: true, selfHeal: true }
    syncOptions: [CreateNamespace=true]
Basic, Advanced 템플릿도 같은 패턴으로 작성합니다 (producer.enabled: false + producer.envId: pool-1).
7.3 Advanced 티어 직접 정의 (원본 3.2와 동일한 학습)
# apps-repo 에 advanced 티어 템플릿 추가
cp tier-templates/premium_tenant_template.yaml tier-templates/advanced_tenant_template.yaml
sed -i \
  -e 's/{TENANT_ID}-premium/{TENANT_ID}-advanced/g' \
  -e '/producer:/,/ingress:/{ s/enabled: true/enabled: false/ }' \
  tier-templates/advanced_tenant_template.yaml

git add tier-templates/advanced_tenant_template.yaml
git commit -m "feat: add advanced tier template"
git push
→ ArgoCD ApplicationSet이 새 폴더(tenants/advanced/*.yaml)를 자동으로 잡아내므로 별도 수동 적용 불필요.
7.4 검증
# 원본 워크샵 4.6과 동일한 엔드투엔드 테스트
APP_LB=$(kubectl get ingress -n tenant-1 -o jsonpath='{.items[0].status.loadBalancer.ingress[0].hostname}')
curl -s -H "tenantID: tenant-1" http://$APP_LB/producer | jq
curl -s -H "tenantID: tenant-2" http://$APP_LB/producer | jq   # environment: pool-1
curl -s -H "tenantID: tenant-3" http://$APP_LB/consumer | jq # environment: tenant-3체크포인트:
- tenant-1(Premium) → producer/consumer 모두
tenant-1- tenant-2(Basic) → 모두
pool-1- tenant-3(Advanced) → producer는
pool-1, consumer는tenant-3
8. STEP 6 — 실습 3: 자동화된 테넌트 온보딩 (Argo Workflows 대체)
원본은 SQS → Argo Events → Argo Workflows → Git push → Flux 였습니다.
GitHub Actions로 동일한 이벤트 드리븐을 만듭니다.
8.1 흐름
사용자 또는 외부 시스템
   │
   ▼
GitHub workflow_dispatch (또는 EventBridge → repository_dispatch)
   │
   ├─▶ infra-repo  : tenants.json 에 항목 추가 → PR
   │       └─ tf-plan / tf-apply 가 SQS/DDB/IRSA 생성
   │
   └─▶ apps-repo   : tier-templates 복사 → tenants/<tier>/<id>.yaml 생성 → PR
           └─ ArgoCD ApplicationSet 가 자동으로 새 Application 발견 → 동기화
8.2 apps-repo/.github/workflows/tenant-onboard.yml
name: tenant-onboard
on:
  workflow_dispatch:
    inputs:
      tenant_id:       { description: 'tenant-id', required: true }
      tenant_tier:     { description: 'basic|advanced|premium', required: true }
      release_version: { description: '0.0', required: true, default: '0.0' }

jobs:
  generate-pr:
    runs-on: ubuntu-latest
    steps:
      - uses: actions/checkout@v4
      - name: Render tier template
        run: |
          set -e
          T=${{ inputs.tenant_id }}
          TIER=${{ inputs.tenant_tier }}
          V=${{ inputs.release_version }}
          mkdir -p tenants/$TIER
          cp tier-templates/${TIER}_tenant_template.yaml tenants/$TIER/$T.yaml
          sed -i "s|{TENANT_ID}|$T|g; s|{RELEASE_VERSION}|$V|g; s|{ACCOUNT_ID}|${{ secrets.AWS_ACCOUNT_ID }}|g; s|{REGION}|ap-northeast-2|g" tenants/$TIER/$T.yaml
      - name: Create PR
        uses: peter-evans/create-pull-request@v6
        with:
          branch: onboard/${{ inputs.tenant_id }}
          title: "Onboard ${{ inputs.tenant_id }} (${{ inputs.tenant_tier }})"
          commit-message: "feat: onboard ${{ inputs.tenant_id }}"
          body: |
            Auto-generated tenant manifest.
            - tenant_id: ${{ inputs.tenant_id }}
            - tier: ${{ inputs.tenant_tier }}
            - release_version: ${{ inputs.release_version }}

  bump-infra:
    runs-on: ubuntu-latest
    steps:
      - uses: actions/checkout@v4
        with:
          repository: ${{ github.repository_owner }}/infra-repo
          token: ${{ secrets.INFRA_REPO_PAT }}
      - run: |
          jq --arg id "${{ inputs.tenant_id }}" --arg tier "${{ inputs.tenant_tier }}" \
            '. += [{"id": $id, "tier": $tier}]' envs/prd/tenants.json > _t && mv _t envs/prd/tenants.json
      - uses: peter-evans/create-pull-request@v6
        with:
          branch: onboard/${{ inputs.tenant_id }}
          title: "Provision infra for ${{ inputs.tenant_id }}"
          commit-message: "chore: add ${{ inputs.tenant_id }} to tenants.json"
          token: ${{ secrets.INFRA_REPO_PAT }}
8.3 실제 실행 (원본 4.2의 SQS 메시지 전송과 동등)
# 원본 워크샵 명령
# aws sqs send-message --queue-url $ONBOARDING --message-body '{"tenant_id":"tenant-1","tenant_tier":"premium","release_version":"0.0"}'

# 본 가이드
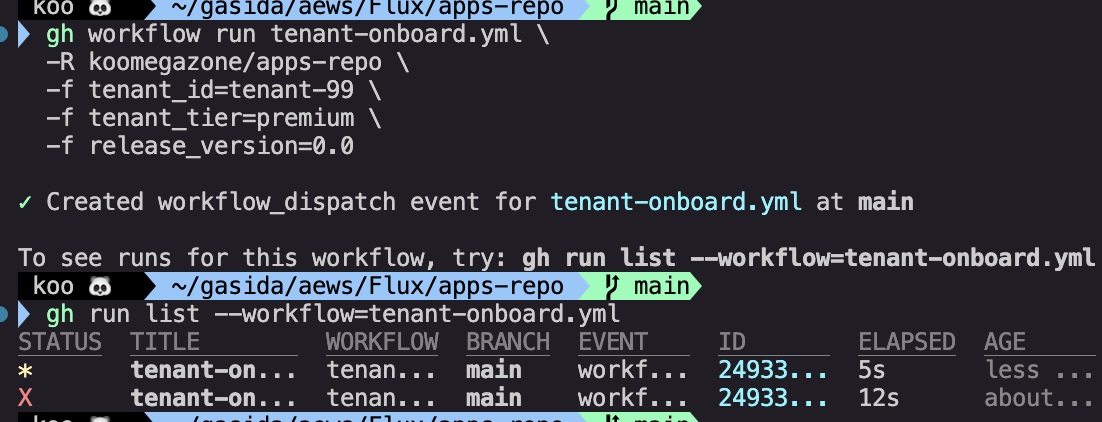
gh workflow run tenant-onboard.yml \
  -R $GH_ORG/apps-repo \
  -f tenant_id=tenant-1 \
  -f tenant_tier=premium \
  -f release_version=0.0
이후 자동 생성된 PR 두 개(apps-repo, infra-repo)를 머지하면 끝입니다.
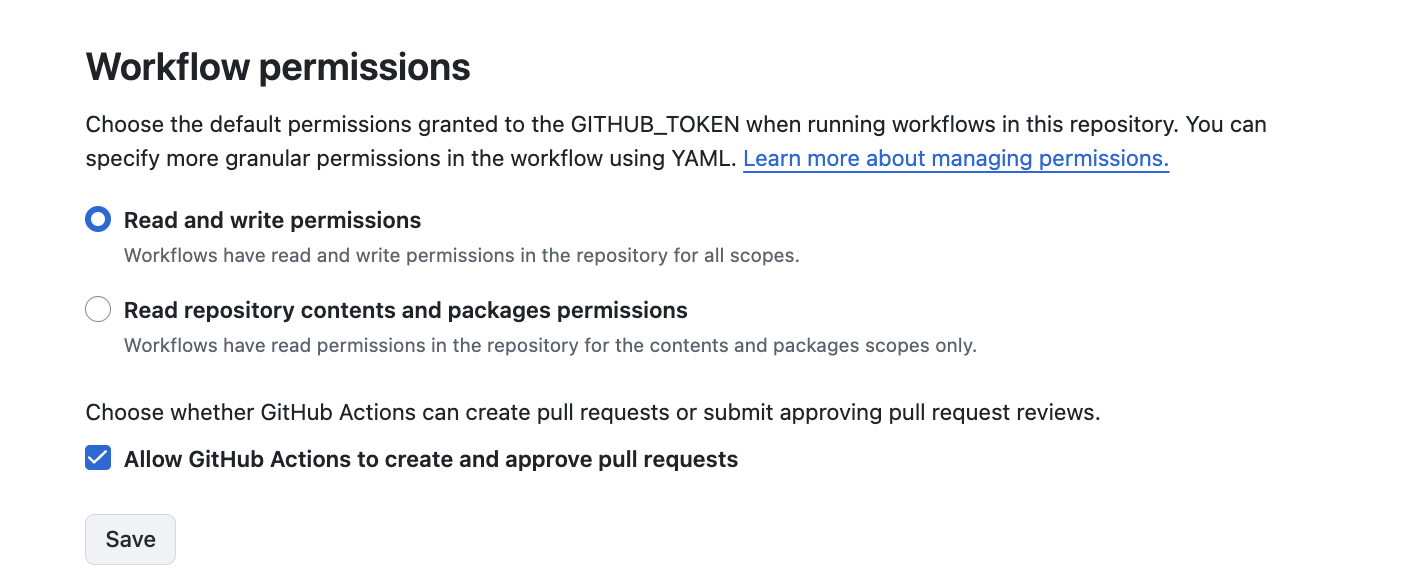
- https://github.com/koomegazone/apps-repo/settings/actions
아래로 스크롤 → "Workflow permissions"
"Read and write permissions" 선택
"Allow GitHub Actions to create and approve pull requests" 체크
Save
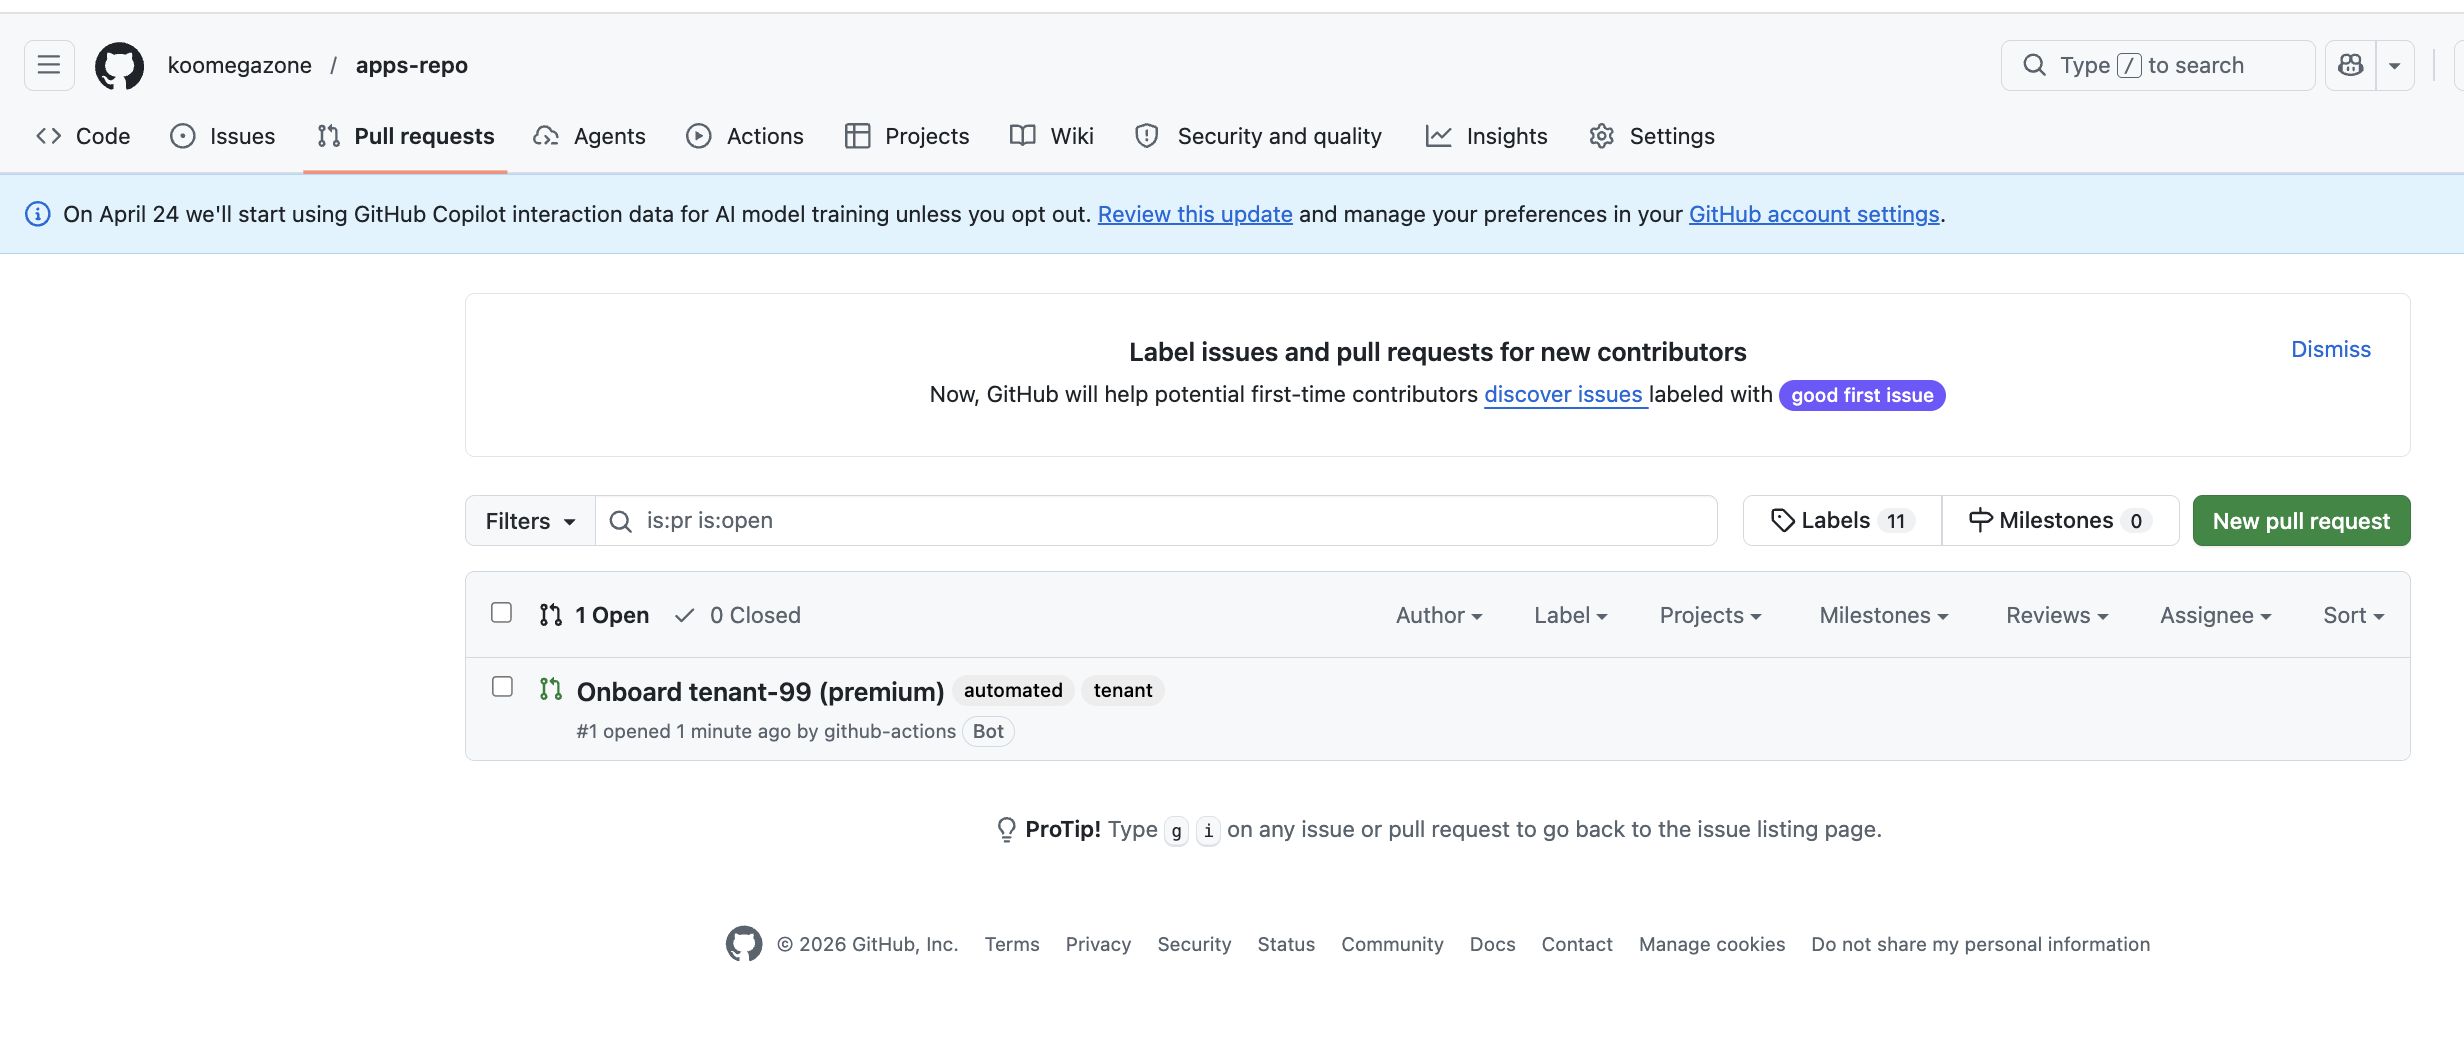
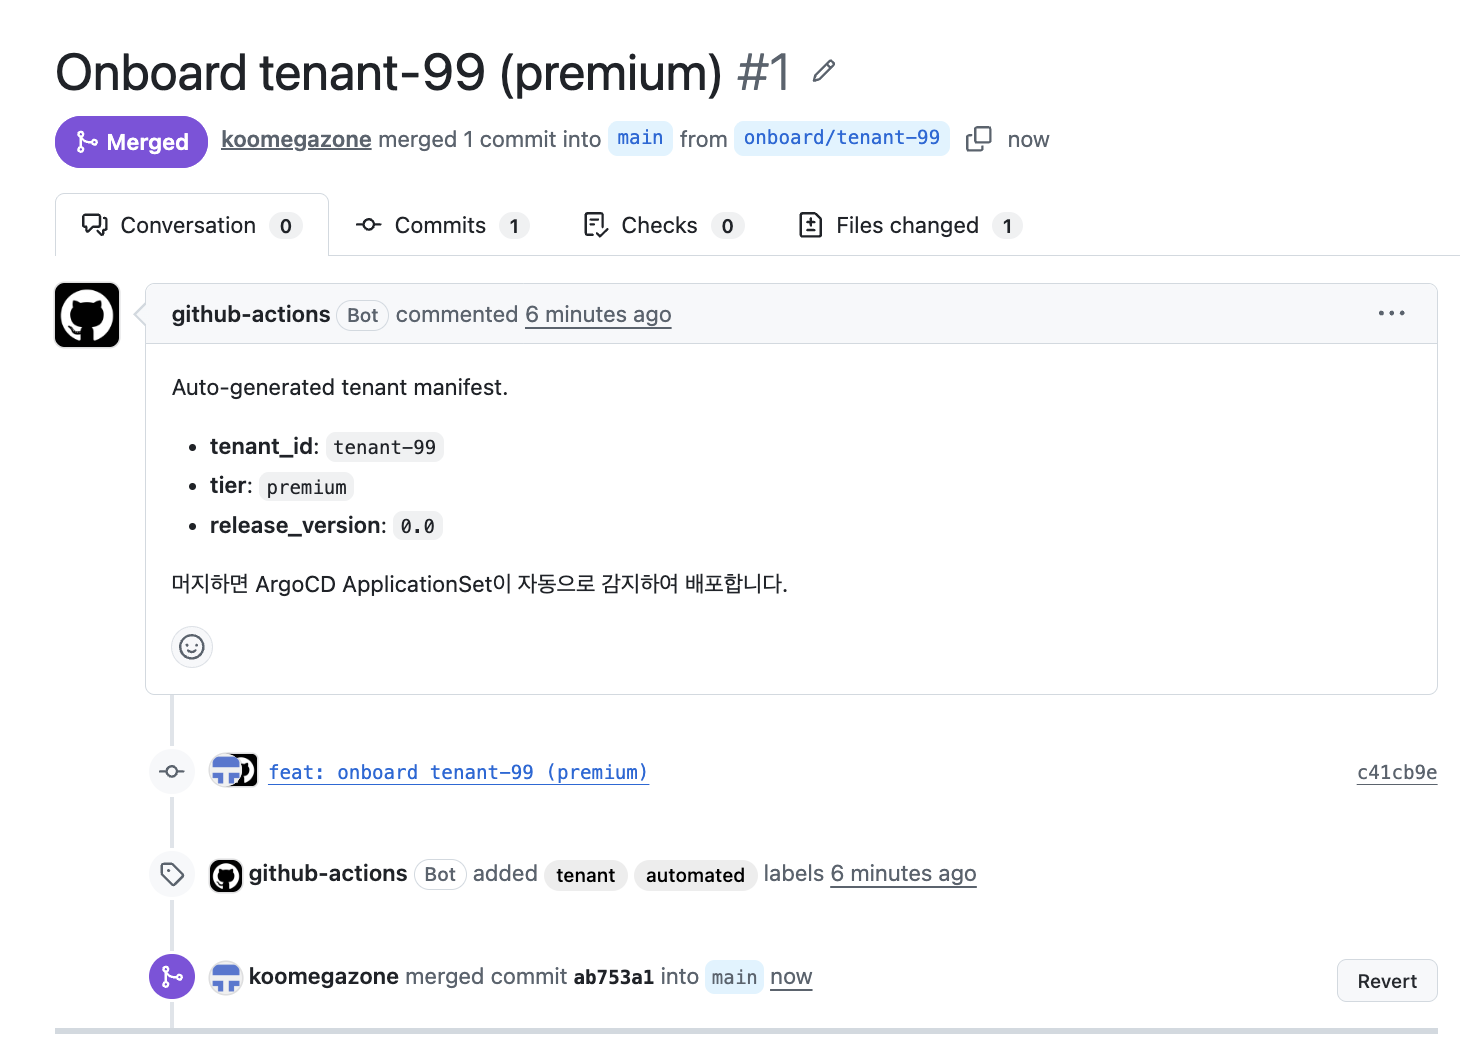
PR이 정상적으로 올라가면 merge 되서 이렇게 github-action이 돌아감
1. gh workflow run tenant-onboard.yml (또는 GitHub UI에서 Run workflow)
   │
   ▼
2. GitHub Actions가 실행됨
   → 티어 템플릿 복사 + sed 치환
   → tenants/premium/tenant-99.yaml 생성
   → PR 자동 생성 (onboard/tenant-99 브랜치)
   │
   ▼
3. 사람이 PR 리뷰 후 Merge 클릭
   │
   ▼
4. main 브랜치에 tenant-99.yaml이 추가됨
   │
   ▼
5. ArgoCD가 Git 변경 감지 (1~2분 내)
   → ApplicationSet이 tenants/premium/tenant-99.yaml 발견
   → tenant-99 Application 자동 생성
   → K8s에 네임스페이스 + Deployment + Service 등 배포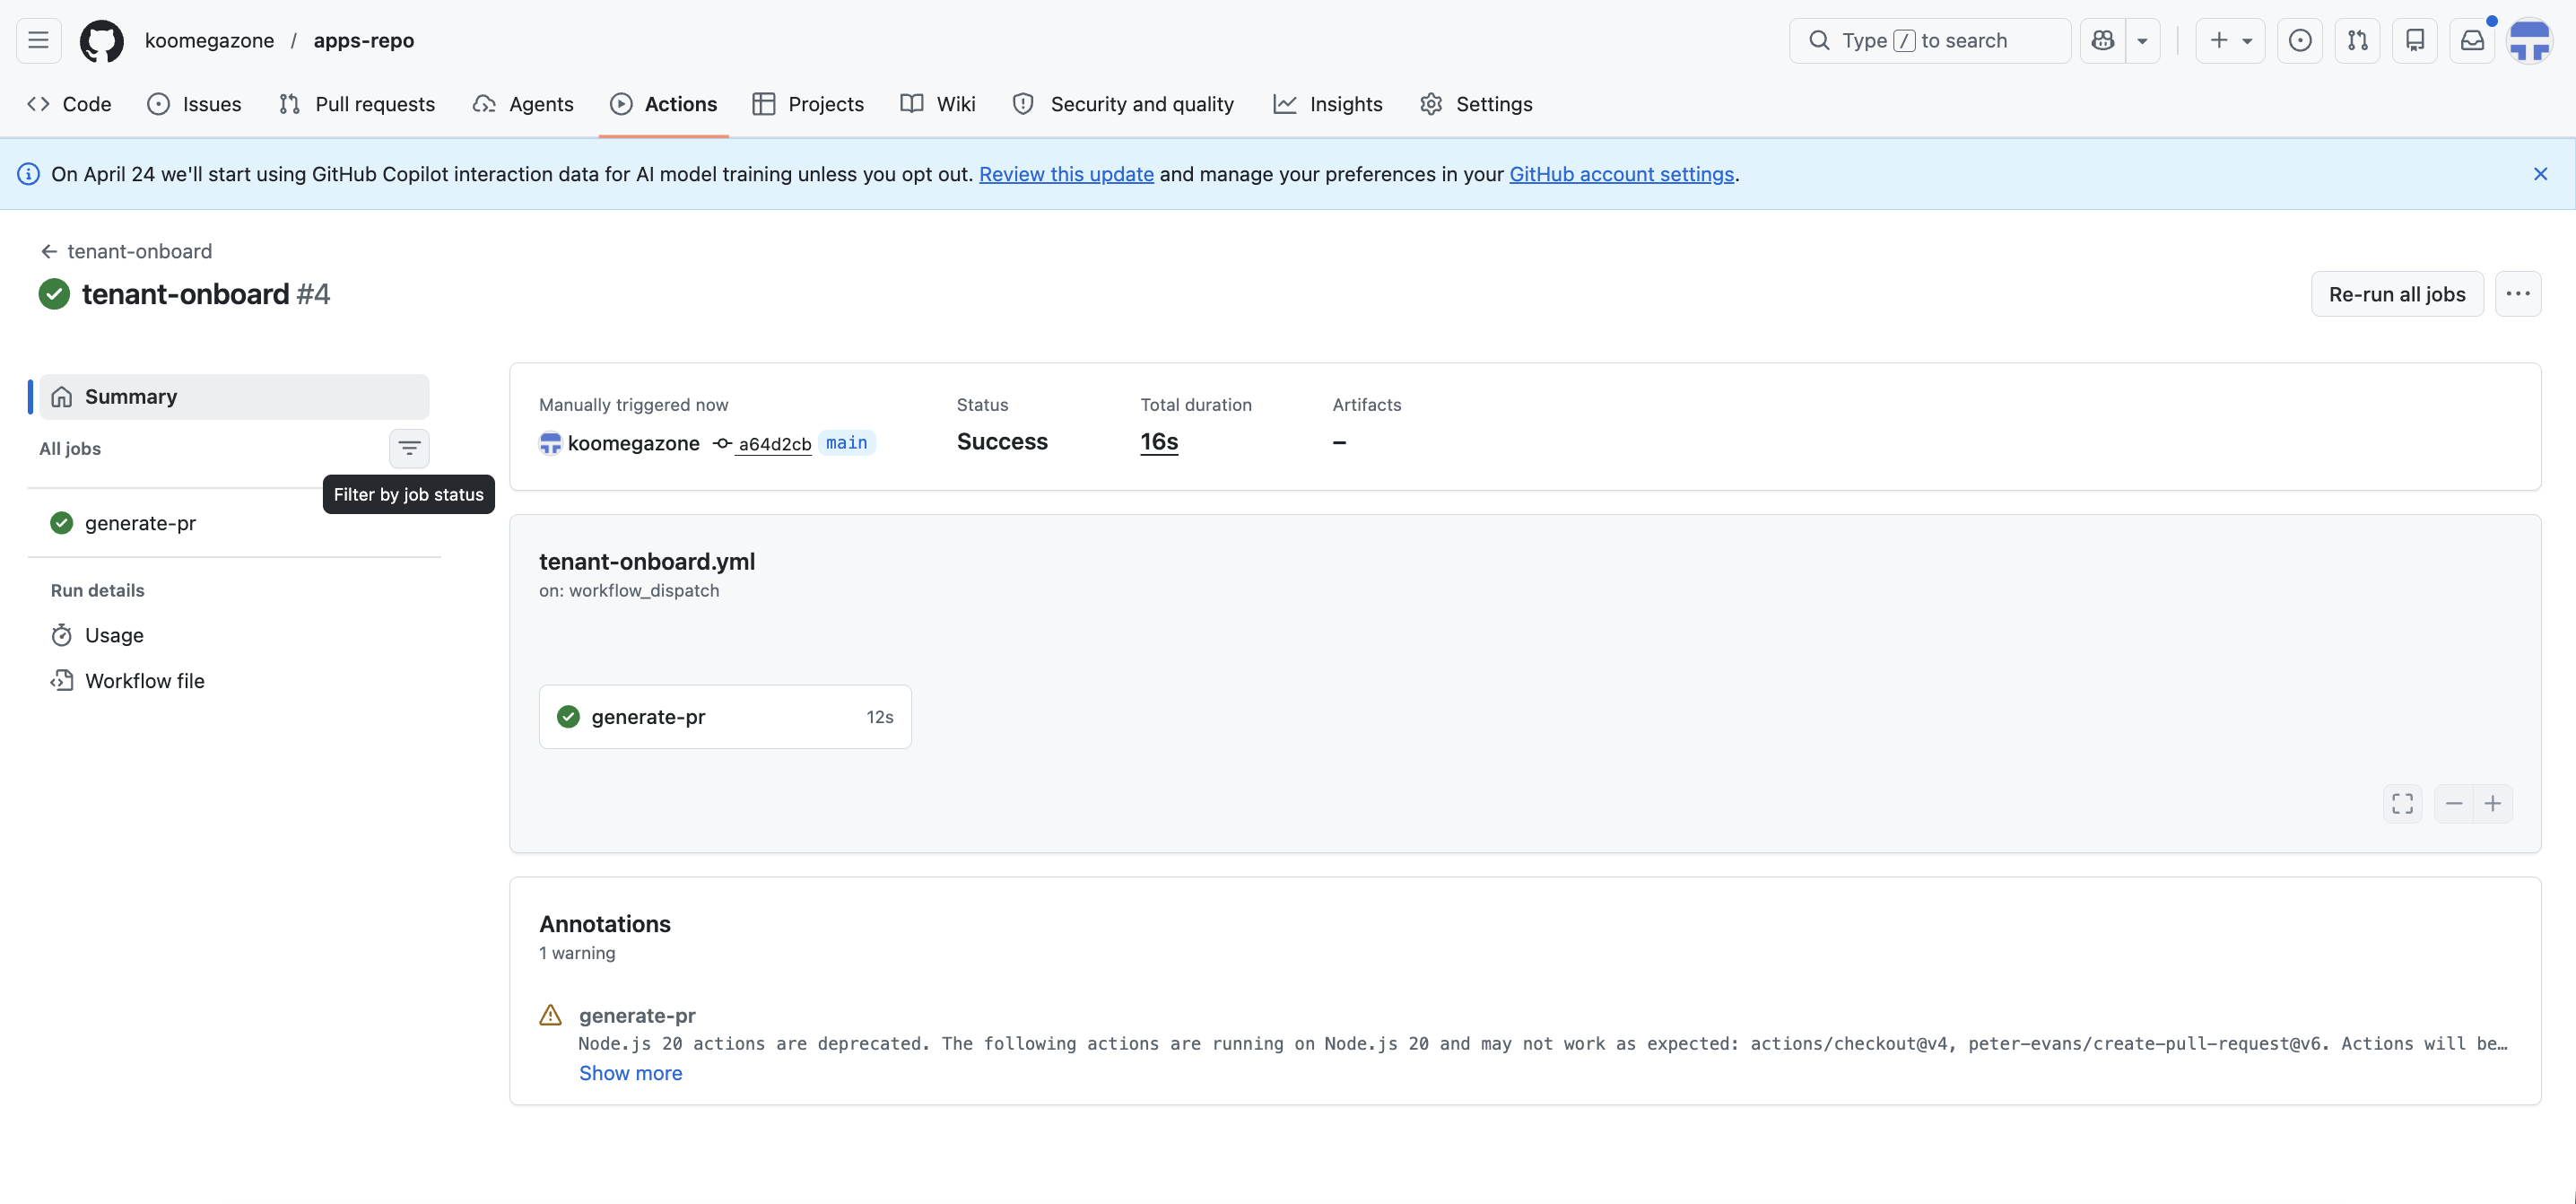
테넌트 온보딩 실습 가이드 (PR 머지 이후)
eks-saas-gitops-tf-actions-argocd.md의 STEP 6까지 완료된 상태에서 이어지는 가이드입니다.
테넌트 온보딩 워크플로우로 PR이 생성되고 머지된 이후, 실제 서비스가 배포되고 동작하는 것을 확인합니다.
1. 테넌트 온보딩 워크플로우 실행
gh workflow run tenant-onboard.yml \
  -R koomegazone/apps-repo \
  -f tenant_id=tenant-99 \
  -f tenant_tier=premium \
  -f release_version=0.2
GitHub Actions가 실행되면:
tier-templates/premium_tenant_template.yaml복사sed로 플레이스홀더 치환 ({TENANT_ID},{RELEASE_VERSION},{ACCOUNT_ID},{REGION})tenants/premium/tenant-99.yaml생성- PR 자동 생성 (branch:
onboard/tenant-99)
2. PR 머지
GitHub 웹 또는 CLI에서 머지:
gh pr list -R koomegazone/apps-repo
gh pr merge <PR번호> --squash -R koomegazone/apps-repo
머지하면 tenants/premium/tenant-99.yaml이 main 브랜치에 추가됩니다.
3. ArgoCD 자동 감지 확인
ArgoCD의 tenants Application이 tenants/ 디렉터리를 directory.recurse: true로 감시하고 있으므로,
머지 후 1~2분 내에 tenant-99 Application이 자동 생성됩니다.
# ArgoCD app 목록 확인
kubectl -n argocd get app

# 예상 결과:
# NAME             SYNC STATUS   HEALTH STATUS
# root             Synced        Healthy
# platform         Synced        Healthy
# tenants          Synced        Healthy
# tenant-1         Synced        Healthy
# tenant-99        Synced        Progressing  ← 새로 생성됨
만약 바로 안 보이면 수동 sync:
kubectl -n argocd patch app tenants --type merge -p '{"operation":{"sync":{"revision":"HEAD"}}}'4. 테넌트 네임스페이스 확인
ArgoCD가 helm-tenant-chart를 기반으로 K8s 리소스를 배포합니다:
# 네임스페이스 확인
kubectl get ns | grep tenant-99

# Pod 확인
kubectl -n tenant-99 get pods

# 예상 결과 (Premium 티어):
# NAME                                    READY   STATUS    RESTARTS   AGE
# tenant-99-producer-xxxxx-xxxxx          1/1     Running   0          1m
# tenant-99-consumer-xxxxx-xxxxx          1/1     Running   0          1m
# tenant-99-payments-xxxxx-xxxxx          1/1     Running   0          1m
Premium 티어이므로 producer, consumer, payments 3개 모두 배포됩니다.
# Service 확인
kubectl -n tenant-99 get svc

# 예상 결과:
# NAME                  TYPE        CLUSTER-IP      EXTERNAL-IP   PORT(S)   AGE
# tenant-99-producer    ClusterIP   172.20.x.x      <none>        80/TCP    1m
# tenant-99-consumer    ClusterIP   172.20.x.x      <none>        80/TCP    1m
# tenant-99-payments    ClusterIP   172.20.x.x      <none>        80/TCP    1m
5. 서비스 동작 테스트
5.1 클러스터 내부에서 테스트
# producer 테스트
kubectl run test --rm -it --image=curlimages/curl -- \
  curl http://tenant-99-producer.tenant-99.svc.cluster.local/

# 예상 응답:
# {"service": "producer", "tenant": "tenant-99", "environment": "tenant-99", "status": "ok"}

# consumer 테스트
kubectl run test --rm -it --image=curlimages/curl -- \
  curl http://tenant-99-consumer.tenant-99.svc.cluster.local/

# 예상 응답:
# {"service": "consumer", "tenant": "tenant-99", "environment": "tenant-99", "status": "ok"}

# payments 테스트
kubectl run test --rm -it --image=curlimages/curl -- \
  curl http://tenant-99-payments.tenant-99.svc.cluster.local/

# 예상 응답:
# {"service": "payments", "tenant": "tenant-99", "status": "ok"}
5.2 port-forward로 로컬 테스트
# 터미널 1
kubectl -n tenant-99 port-forward svc/tenant-99-producer 8080:80

# 터미널 2
curl http://localhost:8080
6. 티어별 비교
tenant-1 (Premium)
kubectl -n tenant-1 get pods
# producer ✅  consumer ✅  payments ✅

kubectl run test --rm -it --image=curlimages/curl -- \
  curl http://tenant-1-producer.tenant-1.svc.cluster.local/
# {"service": "producer", "tenant": "tenant-1", "environment": "tenant-1", "status": "ok"}
tenant-2 (Basic)
kubectl -n tenant-2 get pods
# payments ✅ (producer/consumer 없음 — 공유 풀 사용)

kubectl run test --rm -it --image=curlimages/curl -- \
  curl http://tenant-2-payments.tenant-2.svc.cluster.local/
# {"service": "payments", "tenant": "tenant-2", "status": "ok"}
tenant-3 (Advanced)
kubectl -n tenant-3 get pods
# consumer ✅  payments ✅ (producer 없음)

kubectl run test --rm -it --image=curlimages/curl -- \
  curl http://tenant-3-consumer.tenant-3.svc.cluster.local/
# {"service": "consumer", "tenant": "tenant-3", "environment": "tenant-3", "status": "ok"}
7. 테넌트 오프보딩
gh workflow run tenant-offboard.yml \
  -R koomegazone/apps-repo \
  -f tenant_id=tenant-99
PR이 생성되면 머지:
gh pr list -R koomegazone/apps-repo
gh pr merge <PR번호> --squash -R koomegazone/apps-repo
머지 후 ArgoCD가 prune: true 설정에 의해 tenant-99의 모든 K8s 리소스를 자동 삭제합니다:
# 확인
kubectl get ns | grep tenant-99
# (없어야 정상)

kubectl -n argocd get app | grep tenant-99
# (없어야 정상)
8. 트러블슈팅
Pod이 ImagePullBackOff
ECR에 이미지가 없거나 태그가 안 맞는 경우:
# 어떤 이미지를 찾는지 확인
kubectl -n tenant-99 describe pods | grep "Image:"

# ECR에 이미지 있는지 확인
aws ecr list-images --repository-name producer --region ap-northeast-2
exec format error
Mac(ARM)에서 빌드한 이미지를 EKS(x86_64)에서 실행하려는 경우:
# amd64로 빌드
docker buildx build --platform linux/amd64 --push \
  -t 064711168361.dkr.ecr.ap-northeast-2.amazonaws.com/producer:0.2 \
  services/producer
ArgoCD가 변경을 감지 못함
# tenants app 수동 sync
kubectl -n argocd patch app tenants --type merge -p '{"operation":{"sync":{"revision":"HEAD"}}}'

# 또는 특정 테넌트 app sync
kubectl -n argocd patch app tenant-99 --type merge -p '{"operation":{"sync":{"revision":"HEAD"}}}'
GitHub Actions 워크플로우 실패
# 실패 로그 확인
gh run list --workflow=tenant-onboard.yml -R koomegazone/apps-repo
gh run view --log-failed -R koomegazone/apps-repo
주요 원인:
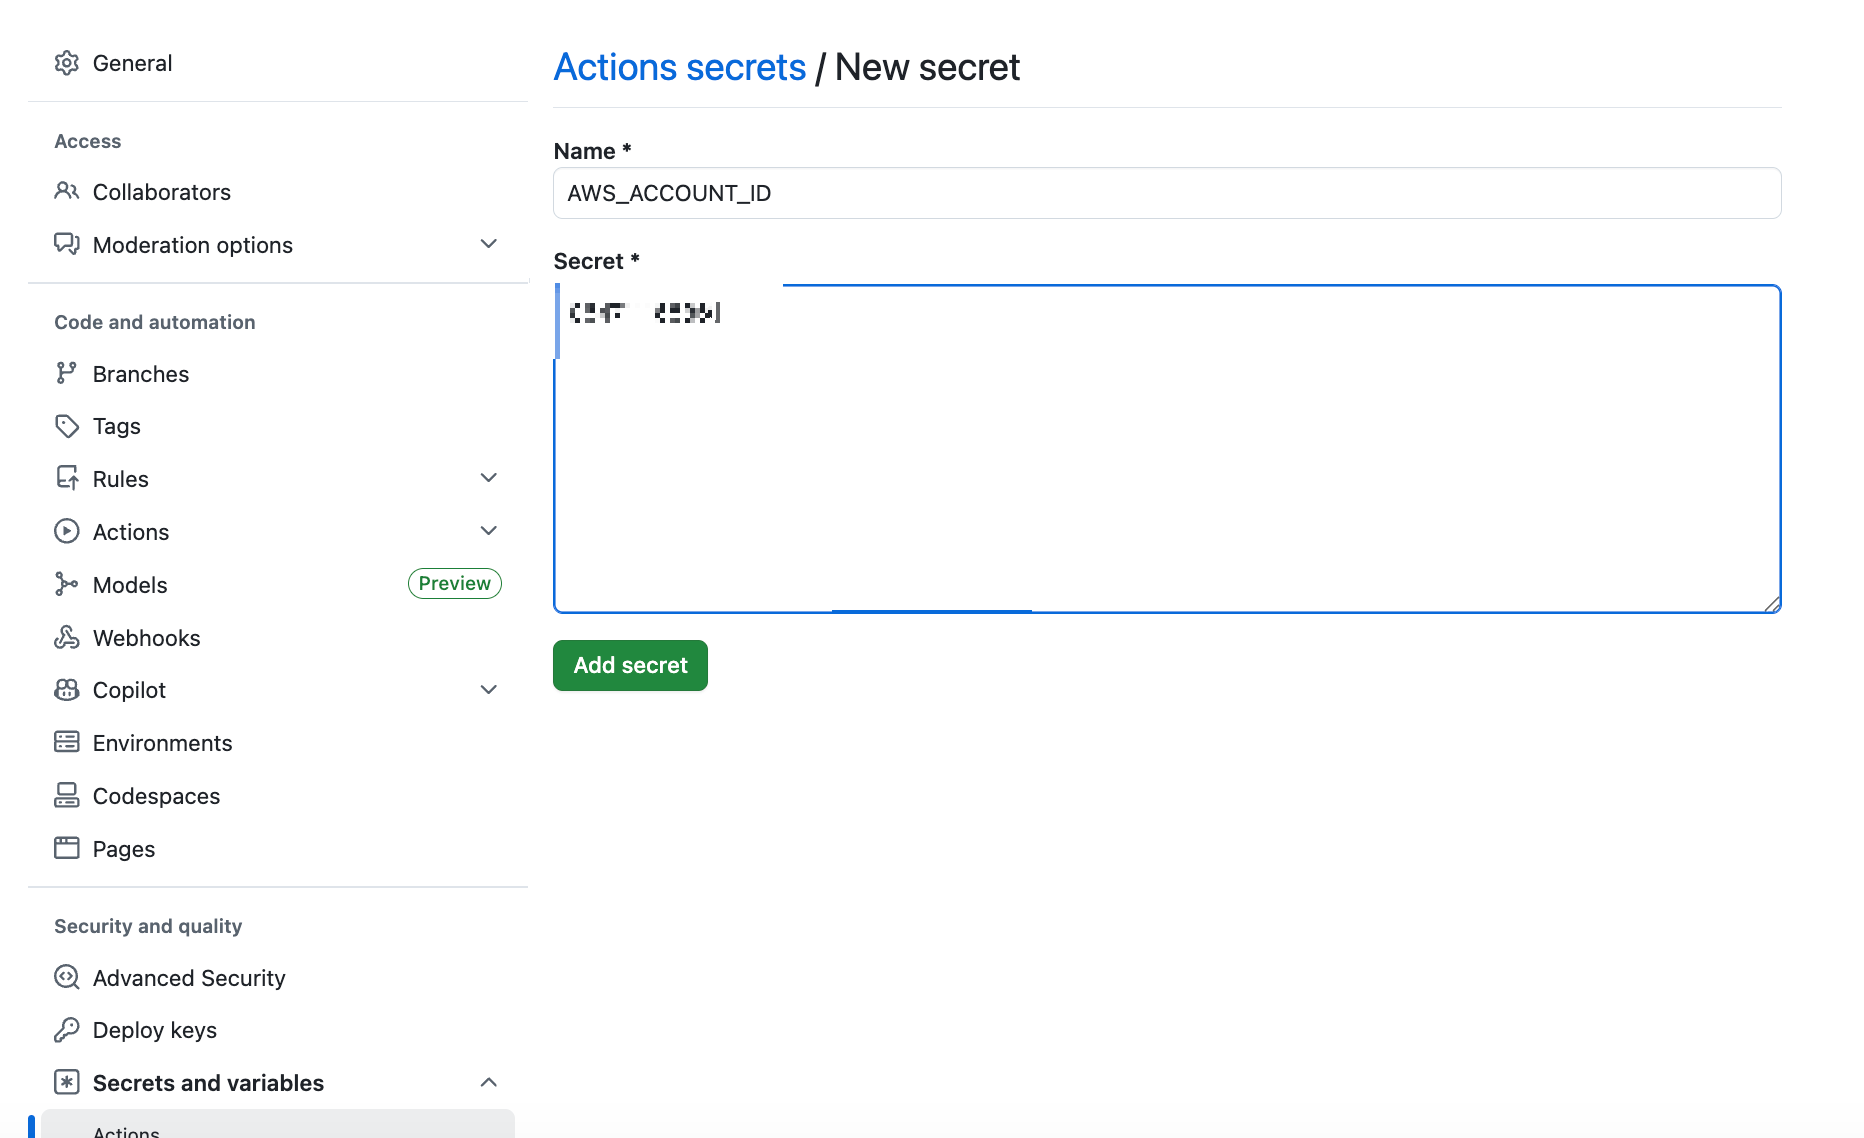
AWS_ACCOUNT_IDSecret 미등록 → apps-repo Settings → Secrets에 추가- Workflow permissions → "Read and write permissions" + "Allow GitHub Actions to create and approve pull requests" 활성화
9. 전체 흐름 요약
gh workflow run tenant-onboard.yml
    │
    ▼
GitHub Actions: 티어 템플릿 복사 + sed 치환 → PR 생성
    │
    ▼
사람이 PR 리뷰 후 Merge
    │
    ▼
apps-repo main 브랜치에 tenants/<tier>/<tenant-id>.yaml 추가
    │
    ▼
ArgoCD tenants Application이 Git 변경 감지 (1~2분)
    │
    ▼
helm-tenant-chart 기반으로 K8s 리소스 자동 배포
  - Namespace 생성
  - Deployment (producer/consumer/payments, 티어별)
  - Service (ClusterIP)
  - ServiceAccount (IRSA)
  - HPA
  - Ingress (enabled인 경우)
    │
    ▼
서비스 동작 확인
  curl http://<service>.<namespace>.svc.cluster.local/
8.4 오프보딩
gh workflow run tenant-offboard.yml -R $GH_ORG/apps-repo -f tenant_id=tenant-1워크플로우는 다음을 수행합니다.
apps-repo:tenants/<tier>/tenant-1.yaml삭제 PR (→ ArgoCD가 prune 으로 K8s 리소스 제거)infra-repo:tenants.json에서 항목 제거 PR (→ Terraform destroy 11 resources)
원본의
destroyResourcesOnDeletion: true와 동일한 의미.
9. STEP 7 — 이미지 자동 업데이트 (Argo CD Image Updater)
원본 Flux imageupdateautomation 대체.
tier-templates/premium_tenant_template.yaml 메타데이터에 추가:
metadata:
  name: {TENANT_ID}-premium
  namespace: argocd
  annotations:
    argocd-image-updater.argoproj.io/image-list: |
      producer={ACCOUNT_ID}.dkr.ecr.{REGION}.amazonaws.com/producer,
      consumer={ACCOUNT_ID}.dkr.ecr.{REGION}.amazonaws.com/consumer
    argocd-image-updater.argoproj.io/producer.update-strategy: latest
    argocd-image-updater.argoproj.io/consumer.update-strategy: latest
    argocd-image-updater.argoproj.io/write-back-method: git
    argocd-image-updater.argoproj.io/git-branch: main
이후 GitHub Actions가 ECR로 새 이미지를 푸시하면, Image Updater가 ECR을 폴링하여 apps-repo 의 values 파일을 업데이트하는 커밋을 자동으로 생성합니다.
10. 검증 체크리스트
| 검증 항목 | 명령 | 기대값 |
|---|---|---|
| 1. EKS 노드 정상 | kubectl get nodes |
Ready 다수 |
| 2. ArgoCD UP | kubectl -n argocd get pod |
모두 Running |
| 3. ApplicationSet 정상 | argocd app list |
tenant-* 모두 Synced/Healthy |
| 4. 테넌트 인프라 | aws dynamodb list-tables |
consumer-tenant-* 존재 |
| 5. IRSA 매핑 | kubectl -n tenant-1 describe sa tenant-1-consumer |
eks.amazonaws.com/role-arn 어노테이션 존재 |
| 6. 티어 동작 | curl -H "tenantID: tenant-3" $LB/consumer |
environment: tenant-3 |
| 7. End-to-End | aws dynamodb scan (tenant-3 테이블) |
producer_environment=pool-1, consumer_environment=tenant-3 |
| 8. 이미지 업데이트 | git log apps-repo |
argocd-image-updater[bot] 커밋 |
11. 정리(전체 삭제)
부록 A. 자주 보는 트러블슈팅
| 증상 | 원인 | 해결 |
|---|---|---|
| ApplicationSet 이 새 폴더를 못 잡음 | revision: HEAD 와 PR-only 머지 누락 |
targetRevision: main 으로 명시, PR 머지 후 argocd appset get tenants |
tf-apply 가 Error: NoCredentialProviders |
OIDC sub 조건 mismatch |
IAM Role trust policy 의 repo:org/infra-repo:* 오타 확인 |
| Image Updater 가 ECR 인증 실패 | credentials: ext: 스크립트 누락 |
Helm values 에 ECR helper 스크립트 ConfigMap 마운트 |
tenant-apps IRSA 어노테이션 누락 |
OIDC issuer URL 변경 | data.aws_eks_cluster.this.identity[0].oidc[0].issuer 강제 갱신 후 terraform apply -replace |
Helm OCI pull access denied |
ArgoCD Repo Server 노드의 ECR 권한 | argocd-repo-server ServiceAccount 에 IRSA 부여 |
부록 B. 원본 워크샵 ↔ 본 가이드 명령 대응표
| 원본 (Flux) | 본 가이드 (ArgoCD) |
|---|---|
flux get all |
argocd app list && argocd appset list |
flux reconcile source git flux-system |
argocd app sync root |
kubectl get gitrepository -n flux-system |
argocd repo list |
kubectl get helmrelease |
argocd app list -o wide |
kubectl get terraform -n flux-system |
gh run list -w tf-apply |
| Argo Workflows UI | gh run watch 또는 GitHub Actions 탭 |
aws sqs send-message ... onboarding |
gh workflow run tenant-onboard.yml -f ... |
참고 링크
- 원본 솔루션: https://github.com/aws-solutions-library-samples/eks-saas-gitops
- 한국어 README: https://github.com/ianychoi/eks-saas-gitops
- ArgoCD App-of-Apps: https://argo-cd.readthedocs.io/en/stable/operator-manual/cluster-bootstrapping/
- Argo CD Image Updater: https://argocd-image-updater.readthedocs.io
- terraform-aws-modules/eks/aws: https://registry.terraform.io/modules/terraform-aws-modules/eks/aws
- GitOps Bridge: https://github.com/gitops-bridge-dev/gitops-bridge
'DevOps' 카테고리의 다른 글
| [AEWS 4기] EKS 스터디 6주차 (EKS Upgrade ) (0) | 2026.04.27 |
|---|---|
| [AEWS 4기] EKS 스터디 5주차 [ Gitops와 Platform Engineering ] (0) | 2026.04.24 |
| [AEWS 4기] EKS 스터디 5주차 [ EKS 트러블슈팅 ] (0) | 2026.04.17 |
| [AEWS 4기] EKS 스터디 4주차 [ EKS 인증/인가] 암호학 (2) (0) | 2026.04.11 |
| [AEWS 4기] EKS 스터디 4주차 [ EKS 인증/인가] 암호학 (1) (1) | 2026.04.11 |


